Most clinical teams will benefit from utilizing a Pharmacy integration so that order information entered by pharmacy staff help create the orders in ALIS. This saves time entering order details and allows you to be aligned with the pharmacy on these details.
For more information about processing orders using a pharmacy integrations in ALIS, refer to these How to Process Resident Messages and How to Process Incoming Order Messages articles.
If it is not possible to integrate with your community's long term care pharmacy, or if there is an extenuating circumstance in which you may need to quickly add a new order to the resident's MAR, you can always add orders manually on a resident's Manage Orders page. Remember that you can add orders for Applicants too, which allows you to get all medications set up prior to admission.
Manage Orders
There are a few ways to access a resident's Manage Orders page:
- Option 1: In the Medications dropdown menu at the top of your page, click Manage Orders. This brings you to a landing page where you can select a resident or applicant name in the space provided. Click Manage Orders to navigate to that person's page.
This landing page is also the area in which you can download MARs and Physician Orders in bulk. Read these How do I print MARs for all or multiple residents? and How do I view and print Physician’s Orders for all residents? for more details.
- Option 2: On a Resident or Applicant profile, click the Manage Orders button beneath their photo.
- Option 3: If you are on any medications pages (Pass Meds, Administer PRNs, Pharmacies, Medication-related Reports), you can click on the linked resident's name to go directly to their Manage Orders page.
The Manage Orders page displays the resident's basic details at the top, has a buttons for generating documents and taking bulk actions on the orders, and is then split between multiple tabs. To add an order, remain in the defaulted main left-most tab, Orders. You may find it useful to look in the DC/Changed tab or the Audit tab for historical order information.
- Within the Orders tab, there are four different types of orders linked on the left column of the screen: Routines, PRNs, Treatments, and Informationals.
- Determine which type of order you need to add, and navigate to the correct section. You can either scroll down or click on the lefthand boxes to jump directly to the section you need.
- At the top of each section there is a button on the right to add the order of each type. The first and most utilized is Routines, referring to routine medications.
- To add a routine medication to a resident’s MAR, click the +Add Routine button.
Order Information
When you click to add a new order, the first section on the page is the Prescription & Refill Information. In this location you can track prescription dates and keep an uploaded file of the prescription. This section is often skipped an will not impact your MAR or Pass Meds records.
In the Routine or PRN Information section, the required fields are the Medication Name, Route, and Instructions. Even though the other fields are not required to add the order, they will display clearly on the Pass Meds page and on MAR and Physician Order documents.
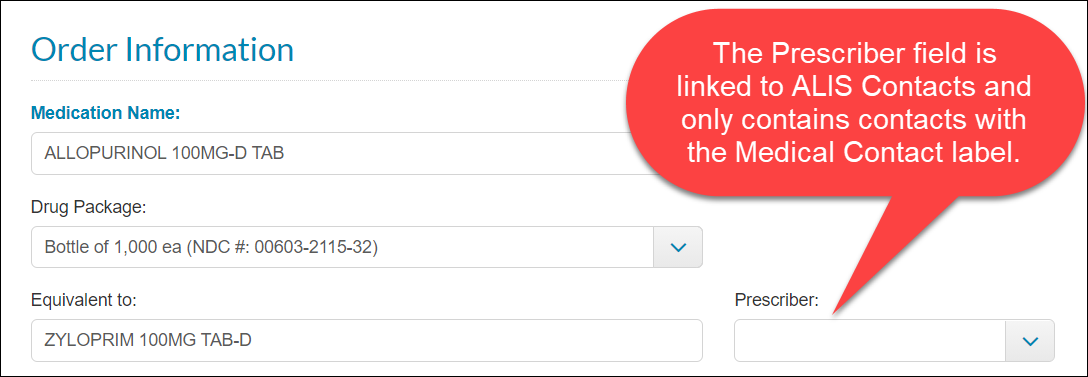
- Medication Name: Type the name here to find it within the database. This should include the name of the order, the strength, and the form of the medication.
-
Drug Package: You can select from this menu to find the package and NDC number in order to set the correct image of the medication if you are using the ALIS Drug Database feature.
- The NDC number refers to a drug package within the National Drug Code Directory. This number allows for you to preview an image of the order and the adverse reactions. In order to see the image and adverse reactions based on this number, you must have the ALIS Drug Database feature turned on. For more information, read this ALIS Drug Database Reference Guide article.
- Equivalent to: The brand name equivalent of a generic medication goes here. This is meant to make it easy for med passers to know when they are working with a generic form of a brand name medication they may already be familiar with.
-
Prescriber: This field is optimized to link the order to a resident's ALIS Contact. You can select any resident contact within your ALIS community who has been tagged as a 'Medical Contact'. This list should include primary care providers, nurse practitioners, and specialists. It is not possible to add a prescriber to this list from this page.
-
If you need to add a prescriber to this list, go to the resident's profile and add the prescriber as a contact with the Medical Contact tag. If you come back to this refreshed page after adding the contact, the contact's name will appear in the list for you to select. Remember that this field is not required, so if that sounds like too much effort at the time, you can leave this field blank. For more information about resident contacts, check out this Resident Contacts Reference Guide article.
- Route: This menu is straightforward!
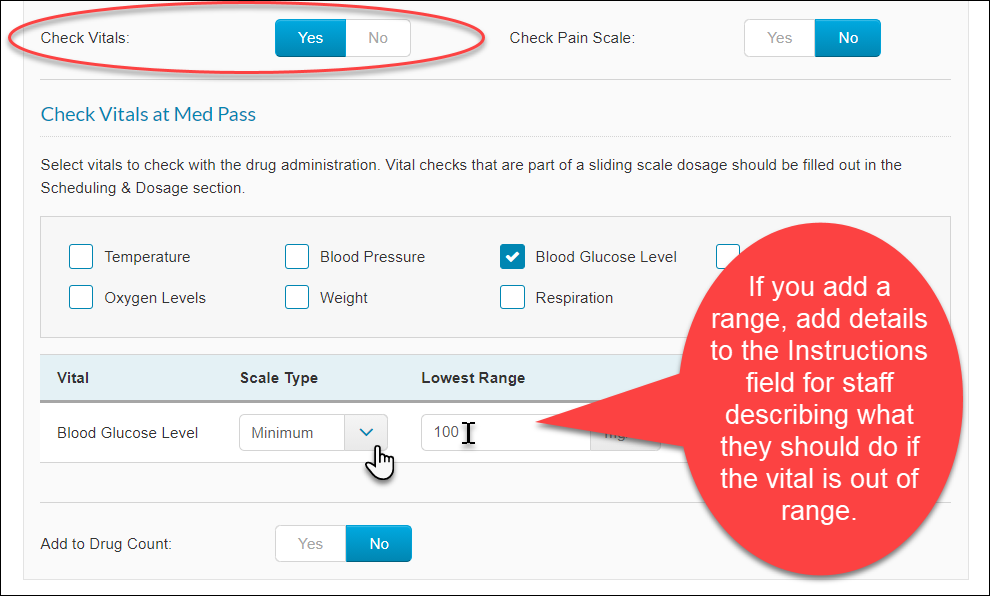
- Instructions: Add complete instructions here. It is recommended to avoid abbreviations. If you are adding a vitals check to the order (this is done in the Order Details box), add more instructions here detailing what med passers should do if the resident's vitals are outside of the safe ranges for the order.
- The checkbox labels to the right of the Route and Instructions should be reviewed carefully, and you should check all that apply to the order. These will display as prominent badges next to the order, and can be used to filter all of your orders in reports. The standard options are listed here, but they can be customized if you want to add or remove some. In bold are the most commonly useful of these labels:
-
Narcotic Drug, Controlled Substance, Antibiotic, Court Ordered, Crush, Do Not Crush, Hazardous, Non-standard Psychotropic, Psychotropic Drug.
-
Narcotic Drug, Controlled Substance, Antibiotic, Court Ordered, Crush, Do Not Crush, Hazardous, Non-standard Psychotropic, Psychotropic Drug.
- Diagnosis: This field populates the right column on the ALIS Physician Orders document next to each order. It is recommended to fill out the relevant diagnosis here for the order.
-
Check Pain Level: Use this toggle to create a required step in Pass Meds and Administer PRNs where the med passer must enter a pain level in order to record order administration. When Check Pain Level is toggled to Yes, without any other selections made, the med passer will have the option to select from a range of faces with corresponding levels 0-10 or use the PAINAD scale to calculate pain level based on non-verbal expressions. Either option used will populate an entry in the required Pain Level field.
-
-
PAINAD Scale Only: When you move the Check Pain Level toggle to Yes, a PAINAD Scale Only toggle appears to the right. When you select Yes for PAINAD Scale Only, only this calculation option will be available in Pass Meds and Administer PRNs. Using this option also tags the order in the main Manage Orders page for visibility.
-
- Injection: If the order is an injection, make sure you click Yes for this option! This will give you space to type a "General Location" that is not required or necessary. In the Med Pass, this requires the med passer to type the injection site on the resident's body, and shows med passers the previous injection site.
- Patch: If the order is a patch that goes on the resident's skin, make sure you click Yes for this option! This will give you space to type a "General Location" that is not required or necessary. More importantly, further down the page in the dose area, you can select the steps of whether the scheduled time is meant for applying, removing, or replacing the patch. In the Med Pass, this requires the med passer to type the patch location on the resident's body, and shows med passers the previous location of the patch.
- Drug Count: If you have the Drug Count turned on, this option will be available. When you click Yes, you will be required to add the current quantity of the order on hand or link the quantity to another order for this resident. For more information about enabling the drug count for an order, read this Enabling medications for the Drug Count article.
-
Check Vitals: When you click yes for this option, you can then select vitals required to be recorded before this order can be administered. When you click the checkbox next to a vital type, you can then optionally select a "Scale Type" which indicates whether there is an acceptable upper, lower, or upper and lower range for the vital. If you add a scale type range of any kind, it is recommended to add details to Instructions a description of what med passers should do if the vital is recorded outside of the range. For more information about vitals in ALIS, read this article: Recording Vitals
Panel on the right side of the page:
-
-
Service Level: The default level is Administer Routine, but you can update the default level for your building in Medications Settings. For assistance, contact our ALIS Customer Success Team.
-
- Administer Routine: This option is appropriate for most orders under most building licenses, with the exception of buildings in Florida.
- Assistance: This is an alternative to Administer Routine for Florida licenses.
- Self-Administered: Mark this option for residents who administer their own medication. When you select this option, you can then choose whether the order should show on the MAR document and/or the Med Pass. The most common practice for this is to check Show in MAR, but uncheck Show in Med Pass.
- Third Party: This has the same options as Self-Administered. Most likely you want the order to show on the MAR, but not in the Med Pass, since third party providers typically do not have access to ALIS and maintain their own MAR tool.
- Nurse Only: This is only available if you have Administer selected above. For more information about Nurse-give Only medications, read this Nurse-Only Orders guide.
-
- Goal: This field is not commonly needed, but certain states may require it. You can enter the physician's stated goal of the resident taking the medication here.
-
Service Level: The default level is Administer Routine, but you can update the default level for your building in Medications Settings. For assistance, contact our ALIS Customer Success Team.
- Physical Description: This field is not commonly needed. Enter here the physical description of the medication.
Routine Orders: Scheduling & Dosage
Required fields are Drug Unit of Measurement, Start Date, Interval, Dosage Type, Dose, and Time.
- Drug Unit of Measurement: This is a long list of possible order unit abbreviations that a pharmacy might use. By far the most common option is TABS, for tablet. Any time you change this field, notice that the Dose field below will reflect the change.
- Packaging: Most likely you want to leave this alone. This menu affects orders tracked in the ALIS Drug Count that are packaged as partial pills in a bubble package. It is a very rare situation that you will need to change this menu from Based on Dose (default) to As 1 Packed Unit.
- Min. Interval Between Admins: It is not recommended to use this menu for Routine Orders, because they are always scheduled for specific days and times. This is very useful for PRNs however. This allows you to select up to 72 hours within 30 minute increments. This is the length of time between administrations that the resident can safely be given the order. The order will show the label 'WAIT' if it is too soon to give the order based on your selection in this menu.
- Start Date: This date can not be edited later, unlike almost everything else on this page.
- End Date: If the order schedule should stop at a specific date and time, make the selection here. This might apply for antibiotics or tapering dose orders. The order will automatically Discontinue at this date, and this field should remain blank for most orders.
- Interval: This determines which days after the start date an order is scheduled on the Med Pass. If you are unsure if you have scheduled the order for the appropriate days based on this, you can always review the resident's MAR after processing to make sure it is scheduled to be given on the intended days. If you need to change this menu later, it is editable from Manage Orders.
- Dosage Type: Almost all orders will be "Fixed". Range dosages are rarely used for Assisted Living, and indicate the resident can basically choose the dosage they want within a range you set. Sliding Scale is used by some communities mostly for the purpose of administering a specific number of insulin units based on the resident's blood glucose level. For more information about sliding scale orders, read this Sliding scale vitals check on medication orders guide.
- Dose: This is the number of units given at the times specified and scheduled below. The unit is determined by the above-mentioned Drug Unit of Measurement field. Select the checkbox "Dose is different per time" if the order is given at multiple times in different amounts.
-
Time: First you must select one of four time range options, and then you can select a specific time. If you need to edit the specific times available within these ranges (Morning, Noon, Evening, Hour of Sleep) for your community, you can do so in Medications Settings. Note that these settings are typically best updated before you 'go-live' on the ALIS eMAR. If you are already actively using the ALIS eMAR, then we recommend contacting your Account Manager or our ALIS Customer Success Team to ensure you make these changes when it will not interfere with Pass Meds.
-
- To add additional administration times, click the green +Add Another Time button.
- To add additional administration times, click the green +Add Another Time button.
-
- +Add Another Schedule: This creates a new section for a separate schedule with different instructions and start and end dates. This may be used for alternating dose orders or tapering dose orders, but do not use this for adding another administration time for a simple order. Refer to these How to enter a tapering dose medication and How to enter an alternating dose medication guides for more information.
PRN Orders: Administration & Dosage
This contains nearly all the same fields as the Scheduling & Dosage section for routine orders. There are two additional fields:
- Max. Admins. in 24 Hours: Select the number of times per day it is prescribed to administer this order.
- Check and Record Outcome: This is an important step to select for your PRNs if you are tracking the outcomes of administering PRN orders. For most orders it is appropriate to select 1 hour, but some medications may take effect very quickly and others after several hours. For the time length you select here, ALIS will require an outcome entry from your med passers. If the outcome time length expires, the PRN outcome will be considered overdue.
It is a good idea to utilize the Min. Interval Between Admins. menu together with the Max. Admins. in 24 Hours menu. It depends on the instructions of the order, but these will both be relevant if an order has instructions such as: can be given every 2 hours, but only a maximum of four times per day.
Med Pass Scheduling Information
It is most common that you should not change this section. Unless advised by your Onboarding manager, do not update the fields here.
Click Create Order
Once all required fields have been filled in with the correct information, click the Create Order button at the bottom right. If orders are enabled for the resident, the next administration time will display on Pass Meds. If your resident is still in the applicant stage, the orders will begin showing on Pass Meds as soon as you Move In the Applicant.
If you scheduled the order for the recent past and you want it to display on the Pass Meds page for the necessary Med Pass Time Frame, read this How to add meds scheduled for the recent past to Pass Meds article for more information.
Related Articles:
- Manage Orders
- Editing Medications, PRNs, and Treatments
- Clone a Medication, Treatment, or PRN
- Pharmacy Connection Reference Guide
Comments
0 comments
Please sign in to leave a comment.