The ALIS eMAR organizes your Pass Meds workflow, generates important documents, and keeps your team informed of important medication details. The Medications Settings page allows you to manage order scheduling functionality and more.
About Medications Settings
Only users with the security role permissions can manage Medications Settings. The majority of these settings are configured at the community level. To access Medications Settings, click the Settings link at the top right corner of your ALIS screen. Then, click Medications.
There are additional tabs that can be made available to your team within this Medications Settings page:
- Drug Count - This is where you can enable and configure counts as well as customize drug destruction methods. To learn about Drug Count settings, read this Drug Count Settings article.
- Barcode Scanning - This is where you can enable and configure Inventory and Med Pass scanning. To learn more about Barcode Scanning, refer to these Barcode Scanning Reference Guide, How To Check in Orders with Barcode Scanning, and How to Use Barcode Scanning in Pass Meds guides.
- eFax Refills - This is where you can enable and configure eFax refills and community contacts. This option may or may not be applicable for you depending on your pharmacy integration type. To learn more about eFax Refills, refer to these eFax Refills and How to Request Refills through your Pharmacy Integration guides.
- Psychotropic Tagging - This is where you can enable medications to be automatically tagged as a psychotropic drug. To learn more about Psychotropic Tagging, refer to these Psychotropic Auto-Tagging GPI Index and Psychotropic Auto-Tagging Rules guides.
For assistance with updating security role permissions and enabling these other eMAR features, contact your Account Manager or our ALIS Customer Success Team.
The below guide explains only the contents of the first tab labeled Medications:
Med Pass Time Shifts
This section is where you dictate what time the daily med pass time frames will begin and end. There are four required med pass times frames (Morning, Noon, Evening, Hour of Sleep) in ALIS that cover the entire 24 hours in a day.
The 4 ALIS default Med Pass Time Shifts are:
- Morning: 5:00AM - 10:59AM
- Noon: 11:00AM - 3:29AM
- Evening: 3:30PM - 7:29PM
- Hour of Sleep: 7:30PM - 4:59AM
Typically, your Onboarding manager will review these Med Pass Time Shifts settings and make changes with you prior to your scheduled eMAR 'go-live' in ALIS. However, once you've been actively using the ALIS eMAR, you may want to further update the names of your shifts or start times.
Prior to making any time changes, consult your Account Manager or our ALIS Customer Success Team to ensure times will not interfere with your current Pass Meds workflow.
It is important to note that updating these time frames, particularly during a shift, can occasionally cause a timeout resulting in some orders to not appear in Pass Meds.
Retry Med Pass Scheduling - While we review and update backend processes for settings to prevent timeouts, this button exists as a manual solution to retry "stamping" the active orders in the current Pass Meds. If a Med Pass Time Shift has recently been changed, and you notice orders disappearing from the MAR, click this button to quickly fix this issue.
Sort Med Pass by Administration Times
This setting impacts how the Pass Meds page is sorted. The ALIS default is set to Enabled, which is the recommended configuration. When enabled, residents show in order of their earliest scheduled and unrecorded medication in Pass Meds.
Sort by Administration Times in Pass Meds:
Default Service Level
Default Service Level refers to the method for administering the order. This setting preselects a Service Level when processing or managing orders and impacts how the MAR is stamped.
The ALIS default is set to Administer, as most Assisted Living licenses "Administer" medications for residents. However, there are other options that may suit your community or state requirements better. It is recommended to select the option here that is most common for your resident medications.
- If you select the default to be Assistance or Third Party, other toggles appear for you to determine whether or not orders should default to show in the Med Pass, MAR, or Administer PRNS.
- Click Save for your change to take effect the next time you process or add a medication. Even with the default you set in your Medications Settings, the Service Level can be adjusted per order, whether processed from the pharmacy or manually added. Refer to these How to Process Incoming Order Messages and How to Manually Add a New Medication guides for more details.
Variance Threshold
This setting determines how long before and after a scheduled med pass time the order will display as being administered "on time" in Pass Meds. The ALIS default is set to "1 hr" for all administration frequencies, and most organizations leave this default for each medication frequency shown here.
- You can change the variance threshold for orders based on how many times daily the medication is scheduled. Click the Show additional medication frequencies link to expand the table of frequencies options and update using the individual dropdown menus if needed. For more information about how the Variance Threshold affects Pass Meds, read this Why does a medication say "WAIT" or "LATE"? article.
AI Scheduling Hints
This section contains ALIS legacy settings which you most likely do not need to update. Currently, these scheduling hints may only apply to you if your pharmacy integration is facilitated by Prescriber's Connection. Consult your Account Manager or our ALIS Customer Success Team first to determine if making changes to these settings would benefit your pharmacy connection.
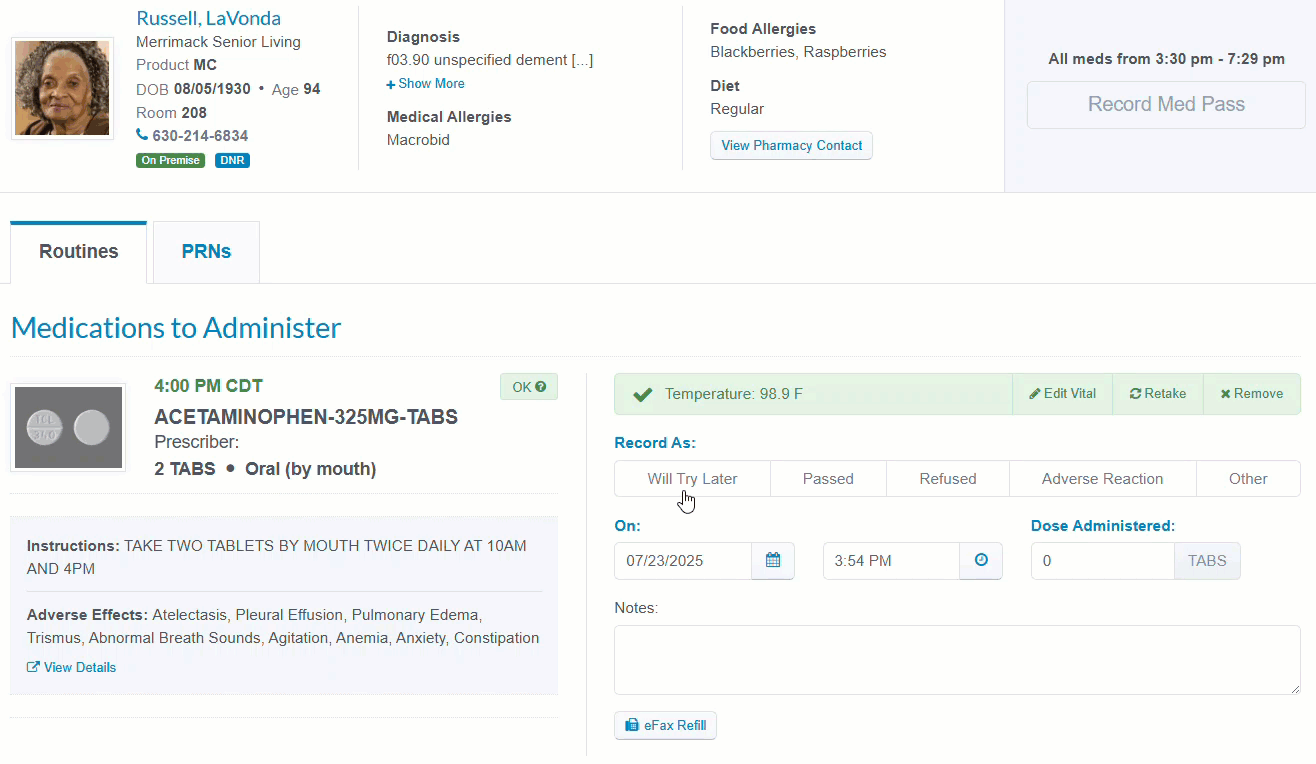
Will Try Later
With this setting enabled, an additional Will Try Later button is added to the outcome options on the Record Med Pass page. The ALIS default is set to Disabled, and most organizations leave this disabled.
Enabling this option does not impact any medication administration records. The purpose of this Will Try Later button is to have a way for med passers to indicate that they have checked all orders on the Record Med Pass page prior to administration.
When a med passer selects the Will Try Later button, it removes any time and dosage component. Even when clicking the Record Med Pass button, this order will still show as "Outstanding" in the Status column of the main Pass Meds landing page.
Will Try Later in Pass Meds:
 Medication Tags
These settings determine which Medication Tag options are available to select when processing orders from the pharmacy or manually adding and managing orders.
When you use Medication Tags on orders, this creates a badge or badges below a medication name on the Record Med Pass page and the Manage Orders page. These tags also allow you to filter orders by the selected tags in reports, and is particularly useful for the Medication List Report.
- Default options listed here can be disabled by clicking the Disable button, except for Controlled, Narcotic Drug, and Psychotropic Drug. To learn more about Psychotropic Auto-Tagging, refer to these Psychotropic Auto-Tagging GPI Index and Psychotropic Auto-Tagging Rules guides.
- You can also create additional tags if needed. Simply click the +Add Tag button, and type the name in the pop-up that appears. Click Submit to save the item to the list and to make available for the next order you attempt to process, add, or edit.
Physician Orders Disclaimer and Signature Lines
These settings allow you to customize the bottom margin of each page of your resident Physician Orders (POs) documents. The ALIS default POs do not contain a disclaimer statement, and the default signature lines are Nurse and Physician.
- You can add a Disclaimer here to communicate important details about pharmacy policies or a refill authorization statement. To add a disclaimer, type into the open text field and click Save to appear on your POs the next time you view or download the documents.
- You can also decide if you want to add, edit, or disable any of the signature lines shown on the POs. Click the +Add New Method button to add a signature line, and use the Options button to edit or disable an existing signature line.
Medication Carts
These settings dictate which options are available to select for each resident that will indicate which cart contains all of their orders. If your community organizes your medications on multiple carts, it is highly recommended add the cart names here as it will allow you to efficiently locate orders in Pass Meds.
Typically, your Onboarding manager will work with you to enable and configure these cart names prior to beginning order processing in your Pharmacy inbox. However, you can update these settings at any time. Any changes you make here will be automatically reflected across ALIS.
- To add a new Medication Cart name, click the +Add Medication Cart link, type the name into the open field and click Save. To edit an existing cart name, click into one of the boxes and edit the text directly.
- If you need to delete any existing cart names, click the red X next to the name. Use caution as deleting a cart here also removes the cart from any residents to which it is already assigned.
- When Medication Carts are configured, you can then manually assign them to each resident. This can be done in the Pharmacies and Manage Orders pages.
- You can also automatically assign Medication Carts to residents based their room assignment. Medication Cart names must first be established in Medications Settings and then added to your Floor Plan settings. To learn more, refer to this How to configure a community Floor Plan guide.
Informational Order Types
These settings allow you to set your Informational Order Types that can be selected when adding orders to residents' Manage Orders pages.
- ALIS auto-generates a list of order types (Ancillary Orders, Code Status, Dietary Orders, Immunizations, and Lab Orders) that can be disabled by clicking the Options button.
- To add new order types, click the +Add New Method button at the top of the table, type the name in the pop-up that appears, and click Submit to save. Newly saved order types will be immediately available on the Manage Orders page. To learn more, refer to this Informational Orders guide.
Community Informationals
When Informationals are added to this section, you can then bulk apply Informationals to multiple residents at a time. The ALIS default does not contain any auto-generated Informationals, and therefore no options will be available until added to these settings.
- To add a Community Informational, click the +Add Informational button. Use the dropdown menu to select the Type, the options which come from your above Informationals settings. Then, type any details about the order type into the Notes field as it pertains to your residents.
- Once created, you can easily bulk apply Community Informationals from this location to residents' Manage Orders pages by multiselecting checkboxes to the left and clicking the Apply to Residents button.
Specialty Settings
History Update Threshold
The ALIS default is set to is "Yesterday". This setting limits how far in the past your med passers can update administration records in the past using Med Pass History. For more information about Med Pass History, read this Med Pass History article.
Bulk Med Pass
This ALIS default is set to Disabled. This setting can be used to bulk record order administration from the main Pass Meds landing page, and it is not commonly enabled. Occasionally this is used during the Onboarding process to quickly generate training data in med pass records.
- Bulk Med Pass On Time - This setting appears only when the Bulk Med Pass is enabled. Equally uncommon as above, this setting allows for bulk recording order administration from the Pass Meds landing page that gets recorded as "on time". This occasionally can be leveraged during the Onboarding process to quickly populate MARs for demonstration.
Vitals Validation
The ALIS default is set to Enabled. This setting restricts the ability to save vitals when the values entered in Pass Meds fall outside of the range that was set when processing or managing orders.
The red validation messaging that appears when a value is not within a range can help prevent incorrect records due to mistypes as well as provide a visual alert for staff that may indicate to them that an order should not be administered due to the vitals taken.
Administration Notes
The ALIS default is set to Disabled. When enabled, this setting adds an Administration Notes open text field in the Process Order and Manage Orders pages for Routines, PRNs, and Treatments. There are some pharmacy integrations that may entirely prevent you from editing the pharmacy-sent order Instructions field, and most organizations and pharmacies prefer that these instructions are not edited.
The Administration Notes field can be particularly useful for adding more resident-specific instructions (i.e., "Crush tablet into applesauce"), including other order details, or to add custom instructions for med passers that highlight internal operations to follow (i.e., "When vitals fall outside of range, contact RN").
Identify Potential Duplicates
The ALIS default is set to Disabled. This setting creates an automated alert when processing an incoming order message if the order being processed has identifying features (Order Name, Rx #, etc.) that match an active order on a resident's MAR.
This setting is particularly useful when undergoing pharmacy transitions within ALIS and when you have had to manually add an order that the pharmacy sends later. For more information on how to process and map new orders to existing orders with this setting enabled, refer to this Map New Pharmacy Messages to Existing Orders guide.
Lock Med Pass Dates and Times
The ALIS default is set to Disabled, meaning that the date and time fields can be edited when recording order administration in Pass Meds. When this setting is enabled, the fields become locked and are not able to be edited. The date and time that auto-populates in this field corresponds to the date and time that the Pass Meds button was clicked on the main Pass Meds landing page.
Weight Tracking and Variances
This feature is behind an entitlement and requires an ALIS team member to enable it in order for this option to appear in Specialty Settings. When the entitlement is turned on, you must also move this toggle to Enabled in order for it to be visible in ALIS. For assistance with enabling the entitlement, contact your Account Manager or our ALIS Customer Success Team.
Weight Tracking and Variances allows you to see which residents do not have weight records within a specified duration (i.e., One Calendar Month), and if the recorded weight vitals presents a specific percentage(%) or unit (lbs) variance that requires further intervention.
When enabled, this setting creates a Monthly Weights option when you go to Bulk Record Vitals. It also adds a Variances tab in Scheduled Vitals that allows you to bulk record weights and view weight variances. For more general information on how to record vitals, refer to this Recording Vitals guide.
Weight Tracking and Variances
This unique settings section also appears below Specialty Settings when the feature is enabled, and it is where you can manage the weight variances parameters for your community that
The ALIS default is set to:
- Product Type: All available company Product Types
- Duration: One Calendar Month
- Percent Change: 5%
- Unit Change: 5 lbs
To make changes to these default settings, click the Manage button and enter your updated choices in the pane that opens to the right. Click Submit to save.
Easily copy your parameters to other communities in ALIS by clicking the Copy To button and selecting which environments to copy the settings to.
For more detailed reporting on weight variances across your company, we can enable the Weight Monitoring Report in your ALIS HQ. Contact your Account Manager or our ALIS Customer Success Team for assistance enabling this dashboard.
MAR Settings
This setting impacts how much health profile and demographic information from the cover page is also displayed on each page of a resident's MAR. The ALIS default is set to Enabled.
Simplified MAR example:
Non-Simplified MAR example:
Medication Exceptions
When an order is not Passed as directed, there are three other options in Pass Meds that are considered "exceptions": Refused, Adverse Reaction, and Other. Out of the box, ALIS provides a required text field when the Other outcome is selected on the Pass Meds page. With this type of setup, the med passer will be prompted to type the exception reason into the text field in order to record medication administration.
Enable Med Pass Exception Options
To accommodate standardization of language when selecting Other in Pass Meds, we have the ability to enable a Medication Exceptions feature, which replaces the open text field with a predetermined and customizable dropdown list of reasons to choose from.
This Medication Exceptions list feature is behind an entitlement and requires an ALIS team member to enable it. Once the entitlement is turned on, the Med Pass Exception Options must then be enabled per community in your Company Settings page. For assistance, contact your Account Manager or our ALIS Customer Success Team.
Once you have enabled this feature for a community, you can navigate back to your Medications Settings page. At the bottom of the page, you will find a newly accessible Medication Exception section. This is where you can further customize the ALIS auto-generated list as well as copy newly added items to other community environments.
- To disable any of the auto-generated options, simply click the Disable button to the right of each item.
- To add a new exception, click the +Add New button. In the pane that opens to the right, type the Name of the exception item you wish to add to your list. Note that this list will always appear in alphabetical order in Pass Meds for ease of use.
-
- Once you have created new exception options, you can multiselect and click the Copy To button. This opens a pane to the right for you to choose which other communities in your portfolio you wish to copy these exceptions to. Once you have made your selections, click Send to complete this action.
-
Related Articles:
- Pass Meds Reference Guide
- How to Process Incoming Order Messages
- Map New Pharmacy Messages to Existing Orders
- Manage Orders
Comments
0 comments
Please sign in to leave a comment.