Pharmacy Connection Reference Guide
Pharmacy Connections allow you to link the information tracked by your pharmacy to orders managed in ALIS. There are different types of connections based on the software your pharmacy uses. The main differences between these are the details that can be sent to ALIS and the length of time required to set up the connection.
Pharmacy Connections rely on the partnership between the ALIS team, the community's team, the pharmacy, and the pharmacy's software. By the time the connection is live for the community, the content of your medications details are based on many factors. This guide does not aim to list all nuances, but sets general expectations for how all Pharmacy Connections can help serve clinical teams who use the ALIS eMAR.
Most connections send information in one direction: from the pharmacy to ALIS. This is enhanced with the ability to request resupplies and refills from ALIS to the pharmacy. Almost all types of connections can support this!
The main functionality to learn if you have a pharmacy connection is how you can create your resident orders in ALIS using the information sent by the pharmacy:
- First we must link the resident profile the pharmacy has to the ALIS resident profile for your resident. Read this article for details: Processing Resident Messages
- When you resident records are connected to the pharmacy, their orders display for you to verify. Learn how to process order messages from the ALIS Pharmacies page, and you can avoid almost all manual entry of order details. Read this article for details: Processing Order Messages
Order Updates
In addition to creating the orders for the eMAR, you can also "map" the pharmacy information to orders you have added to ALIS in the past. ALIS utilizes AI features in the background to make this process as intuitive and accurate. ALIS displays information for you to verify only if the information the pharmacy is sending is significantly different from an order already added to ALIS from that pharmacy.
Read this article to learn about mapping orders: Mapping Pharmacy Messages
Med Changes Report
This report will keep your pharmacy team aware of changes your team manually makes for the orders. Communicating with your pharmacy may already have its challenges, so we have created a report that can email your pharmacy techs if you adjust anything on the eMAR. Read this article for more details: Medication Changes Report
Pharmacy Connection Types
When we onboard your community to have a pharmacy connection, we gather the details from your pharmacy whether they will be using one of the following interface softwares:
- FrameworkLTC
- QS/1
- Omnicare
- Prescribers Connection
The good news is that the experience for your team will be largely the same for all of the above! Long-term care pharmacies differ greatly in their operations, and our integrations are tailored to provide you with the best possible information in ALIS.
Requesting Refills in ALIS
We can set up a link to your pharmacy that allows you to request refills from ALIS. Once this is set up for your community, you can choose whether staff can request the resupplies from Manages Orders or right from the Med Pass.
Read this article for more information about refills and resupply requests: How to Request Order Refills and Resupplies.
How to Process Resident Messages
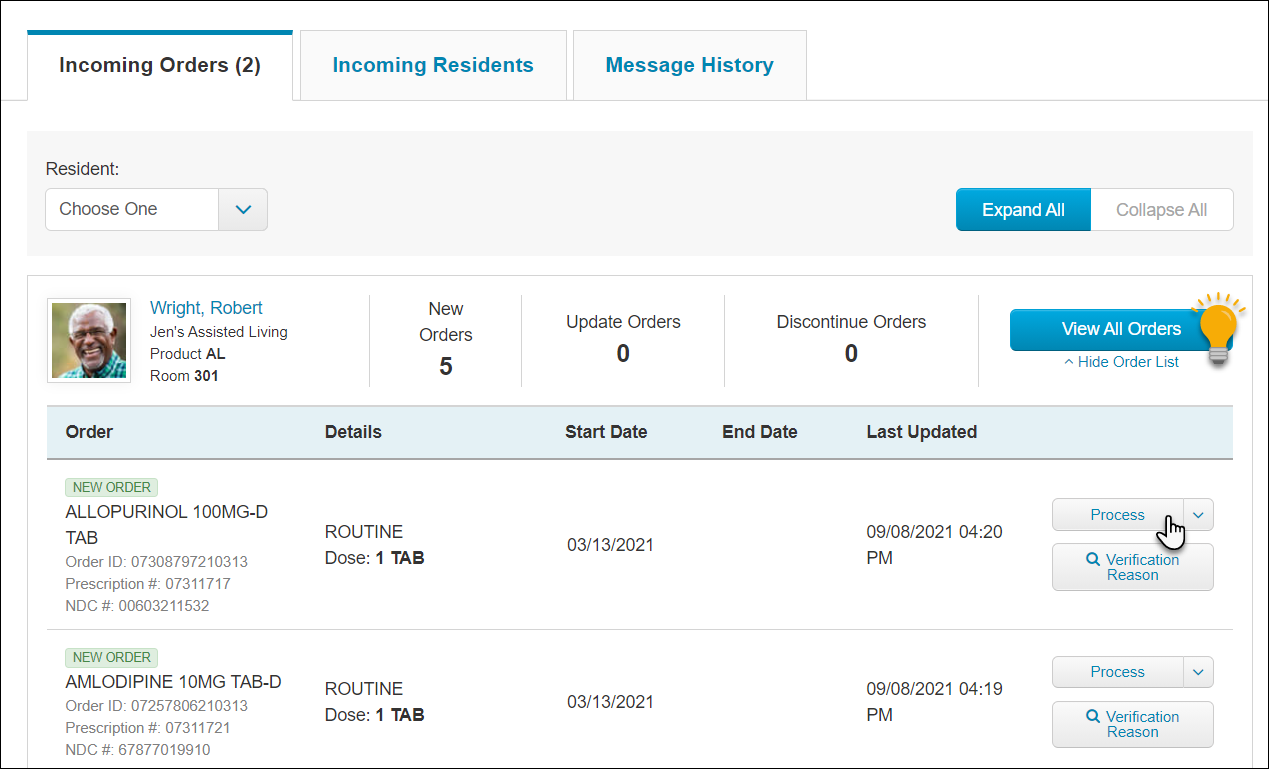
Once the pharmacy is set up in ALIS, you will start receiving messages on the Pharmacies page.
To get started, select either the "Pharmacies" icon on the Dashboard, or click the Medications menu at the top of the screen and click "Pharmacies".![]()
Resident Messages
It is necessary to complete the mapping step for a Resident or Applicant before their orders will display for verification. This connects the resident information at the pharmacy to the resident's ALIS profile.
You will only need to do this once for each resident!
Note: If the Resident or Applicant does not exist in ALIS yet, you will first need to add them so you can map the resident message.
- Click the Resident Messages tab. When you are first implementing the pharmacy connection, each resident should display here. After you map everyone, you will only use this tab going forward to map new residents in your community. For the first resident you want to map, click the Map to ALIS Resident button.
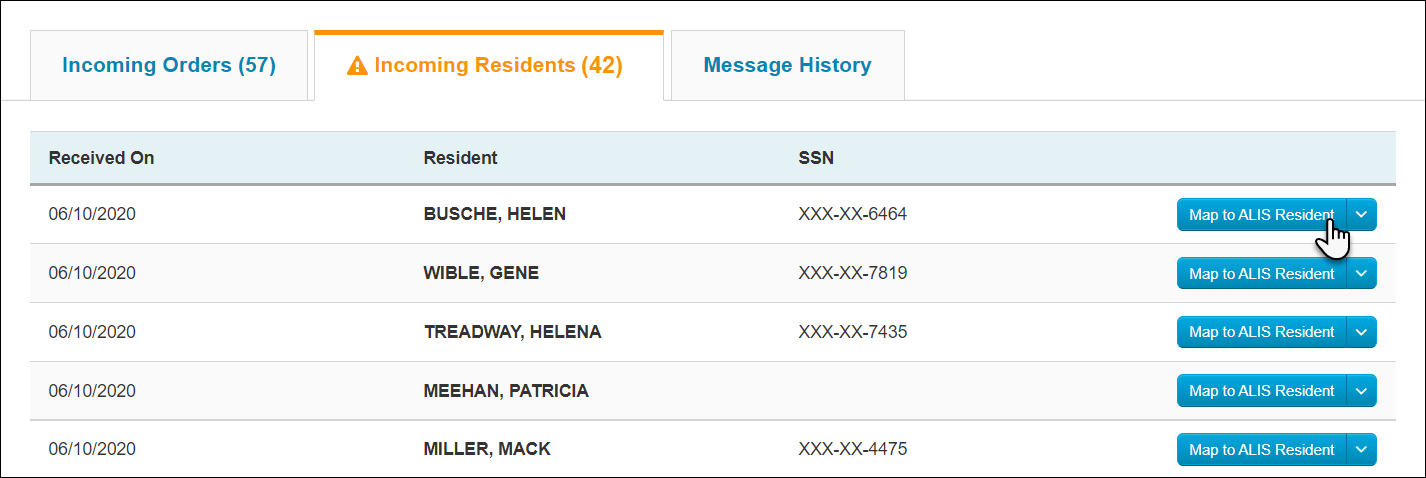
- The first step is to verify the pharmacy profile on the resident matches a resident in ALIS, and Match them together. Most likely, this is an automatic process where ALIS connects the profiles based on the resident name, SSN, and/or DOB. You can verify that the information on the left side and right sides of the page are for the same person, and click Next Step.
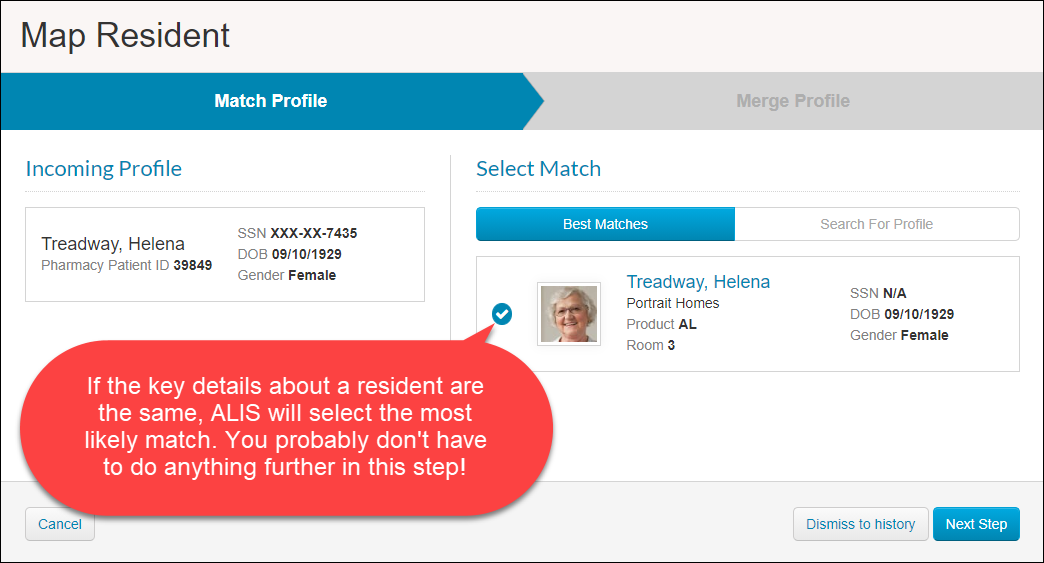
- If no profile shoes on the right side of the screen, this means ALIS does not have a resident or applicant profile that is close enough to what the pharmacy has. You can click Search For Profile and type the resident's name to catch whether the name in ALIS is spelled differently, which does happen occasionally!
- If you can't find a profile close enough, this likely means that the profile has not yet been created in ALIS. Review your All Residents page and create them if needed. Once they exist in ALIS, they will populate the right side of the Map Resident page.
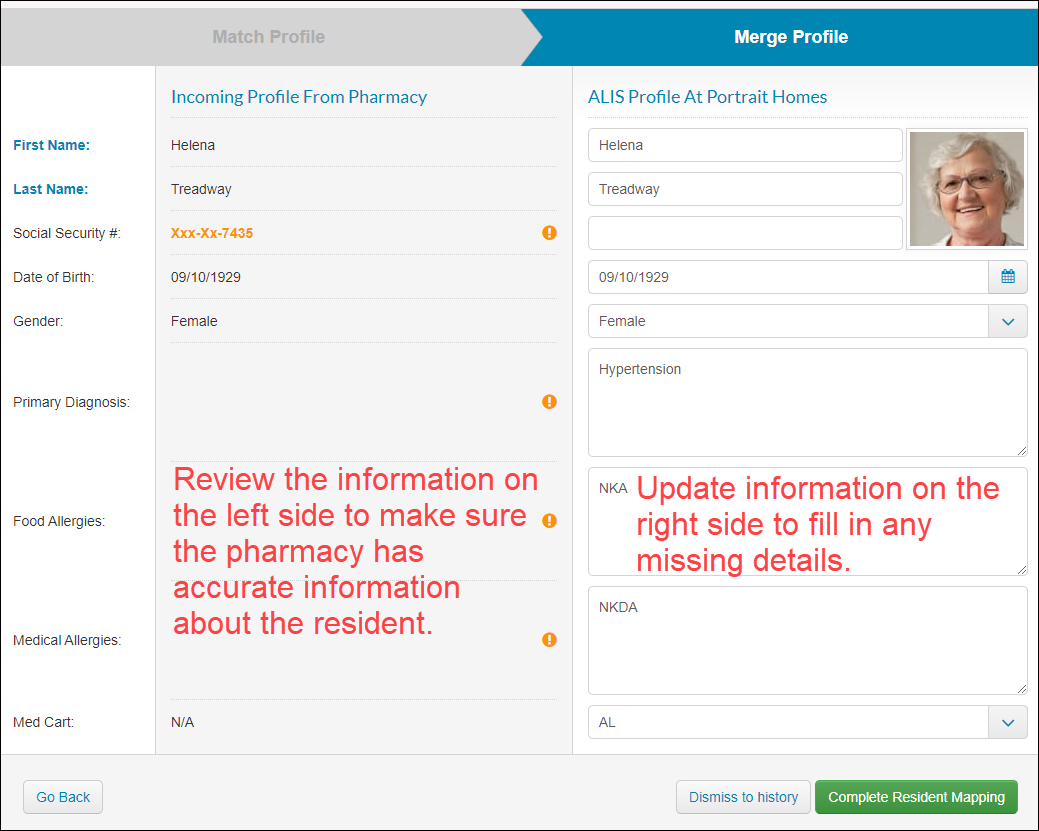
- The next page displays more resident details to verify. The goal is for the information in ALIS to match what the pharmacy has, and for the ALIS profile to be as complete as possible.
- The pharmacy information displays on the left, and then you have the opportunity to add those details to the right side of the screen to be saved in ALIS.
- If any of the information the pharmacy has is incorrect (left side), you should make note of the details and contact the pharmacy so that they can correct any inaccuracy. This is somewhat common for resident birthdates.
- There is no need for concern if the information on the pharmacy side is empty. This does not mean that the pharmacy does not have the information.
- Once you have reconciled the pharmacy information with the information saved in ALIS, click the 'Complete Resident Mapping" button at the bottom right.
Once the resident message has been mapped to a resident in ALIS, the order messages will start to appear in the Medication Messages section of the main Pharmacies page. For more information about processing the Medication Messages, click here.
How to Process Order Messages
After a resident has been mapped between the pharmacy and ALIS, the next step is to process the orders. When you process an order in ALIS, you verify the details the pharmacy has and you can add information that you want to display the Med Pass and on MAR documents.
This article reviews everything you need to know about processing the orders! You will learn how to clear the pharmacy queue of orders for a resident so that they have a complete MAR in ALIS.
The orders sent from the pharmacy come to ALIS in blocks of code, and ALIS interprets them to give you the information needed to populate your resident MARs. In most cases, the orders in the ALIS Pharmacies page already contain the information you need to populate the MAR, and you are double-checking these against your resident's prescription documents, and then simply clicking Process to add them.
When you get started with this process, your resident orders will display here for processing all at once. It may take a few hours to review and process them all. After that, the ALIS Pharmacies page can be used like an inbox, where you only see new, updated, or discontinued order messages for processing. The goal is to keep this inbox clear! When you process all the orders for someone, this means that their ALIS MAR is synchronized with the pharmacy's orders.
View All Orders
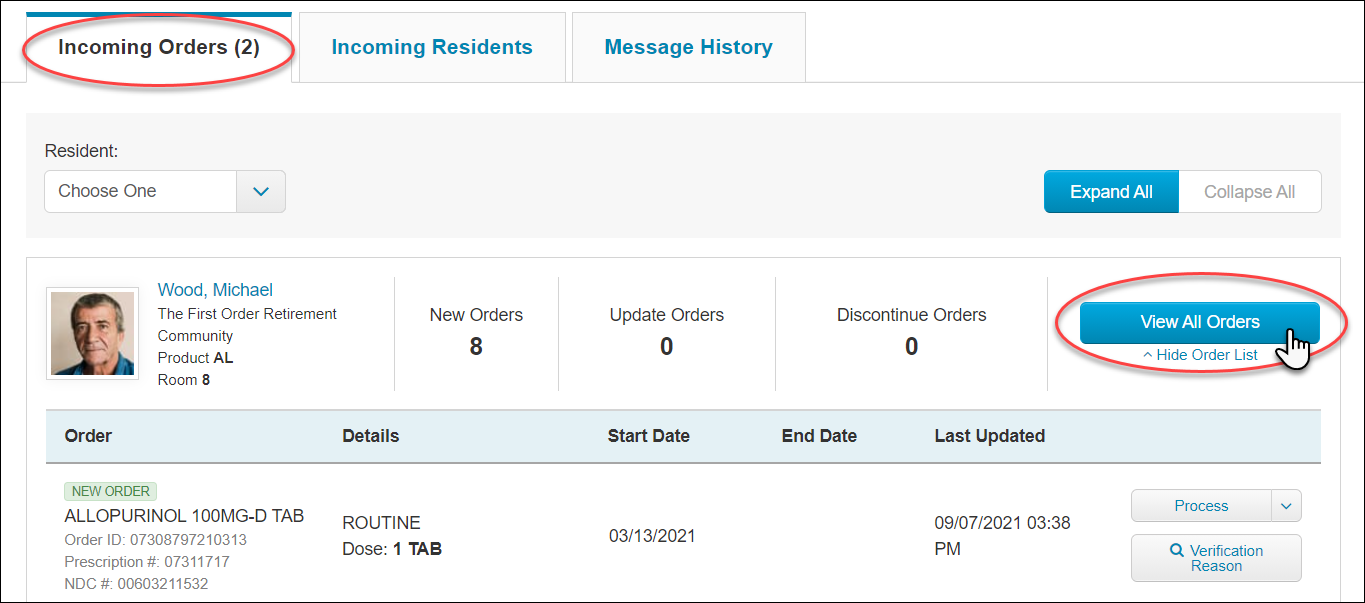
The Incoming Orders tab of the Pharmacies page is where we do all the order processing.
Within Incoming Orders, each resident has one or more orders that must be reviewed. It is easiest to use the View All Orders button to review all orders for a resident, especially if you are just getting started with your building's pharmacy connection.
Click View All Orders to navigate to a new page that shows you only information about one specific resident.
On the View All Orders page, there are four sections:
- The top section shows us details about the resident and their health conditions and allergies.
- Second is a section of Unprocessed Orders. We will work from this list until there are no more orders!
- The third section is a preview of the resident's current orders on their chart. This helps us audit the resident's orders.
- On this screen, this information is not editable, but you can click the View Manage Orders button to make changes to any current orders.
- Last on the page is the history of orders processed for this resident.
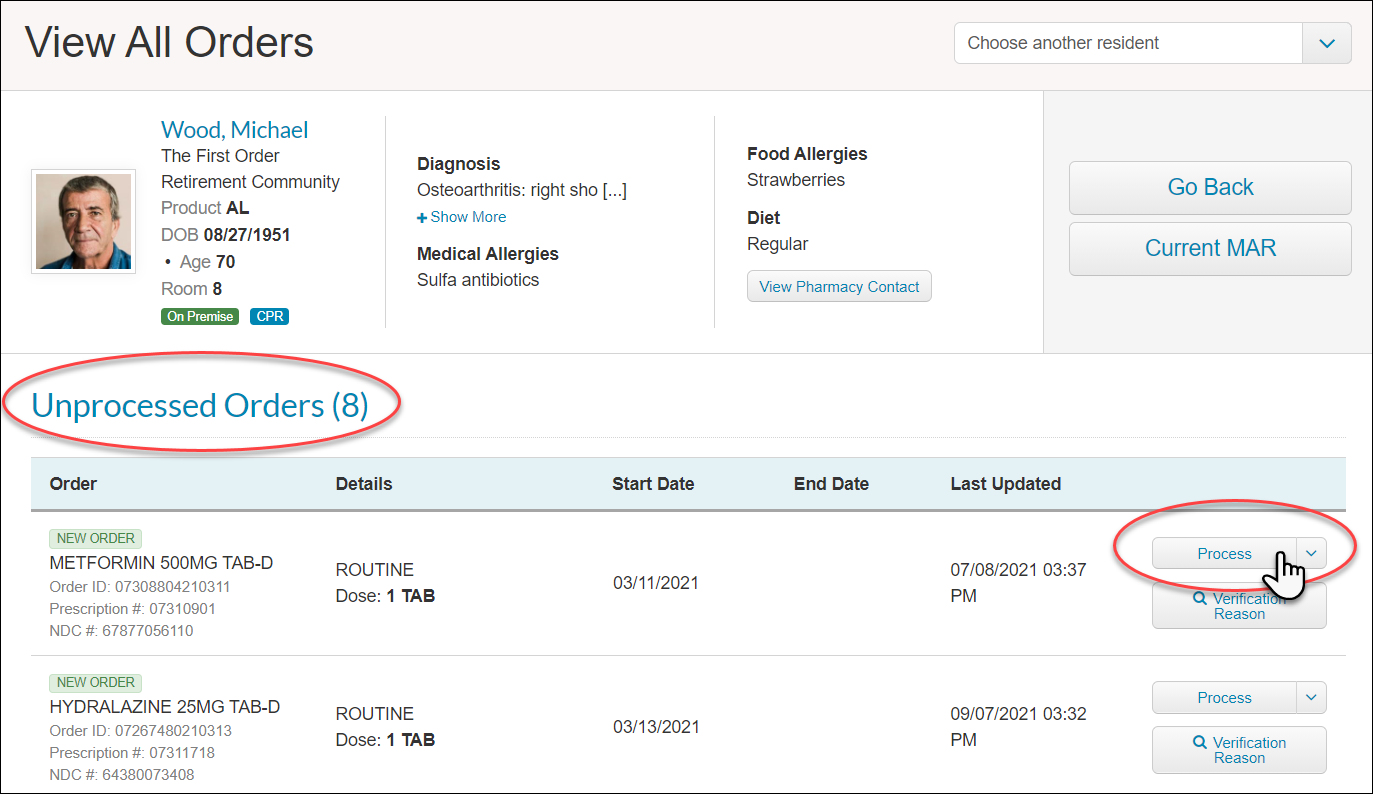
To get started, click Process for any order.
Start Processing
Once you click Process for any order, you are navigated to the details page. This is where we can see all information the pharmacy has that could be interpreted by ALIS. You can add and edit any details that might pertain to the order. When we are done with this review, we click the Process button at the bottom right of the page, and move onto the next order in the queue for this resident.
Read on for a detailed overview of fields in this section below:
Mapping Orders and Rx Message Sections
The top of the page houses basic health details about the resident.
For New Orders, we have a switch to create a New Schedule or Map to Existing Schedule. Mapping to an existing order is a way to ensure that there are no duplicates on the resident's chart, and this is especially relevant if you have used a different pharmacy connection to ALIS in the past, or if you have manually added orders to a resident's Manage Orders. For more information about mapping orders, read this article: Mapping Pharmacy Messages
For Updated Orders, this section will show details about the existing order.
The right-most panel of this page always contains a button to View Rx Message where you may find additional information such as the pharmacy tech who entered the order.
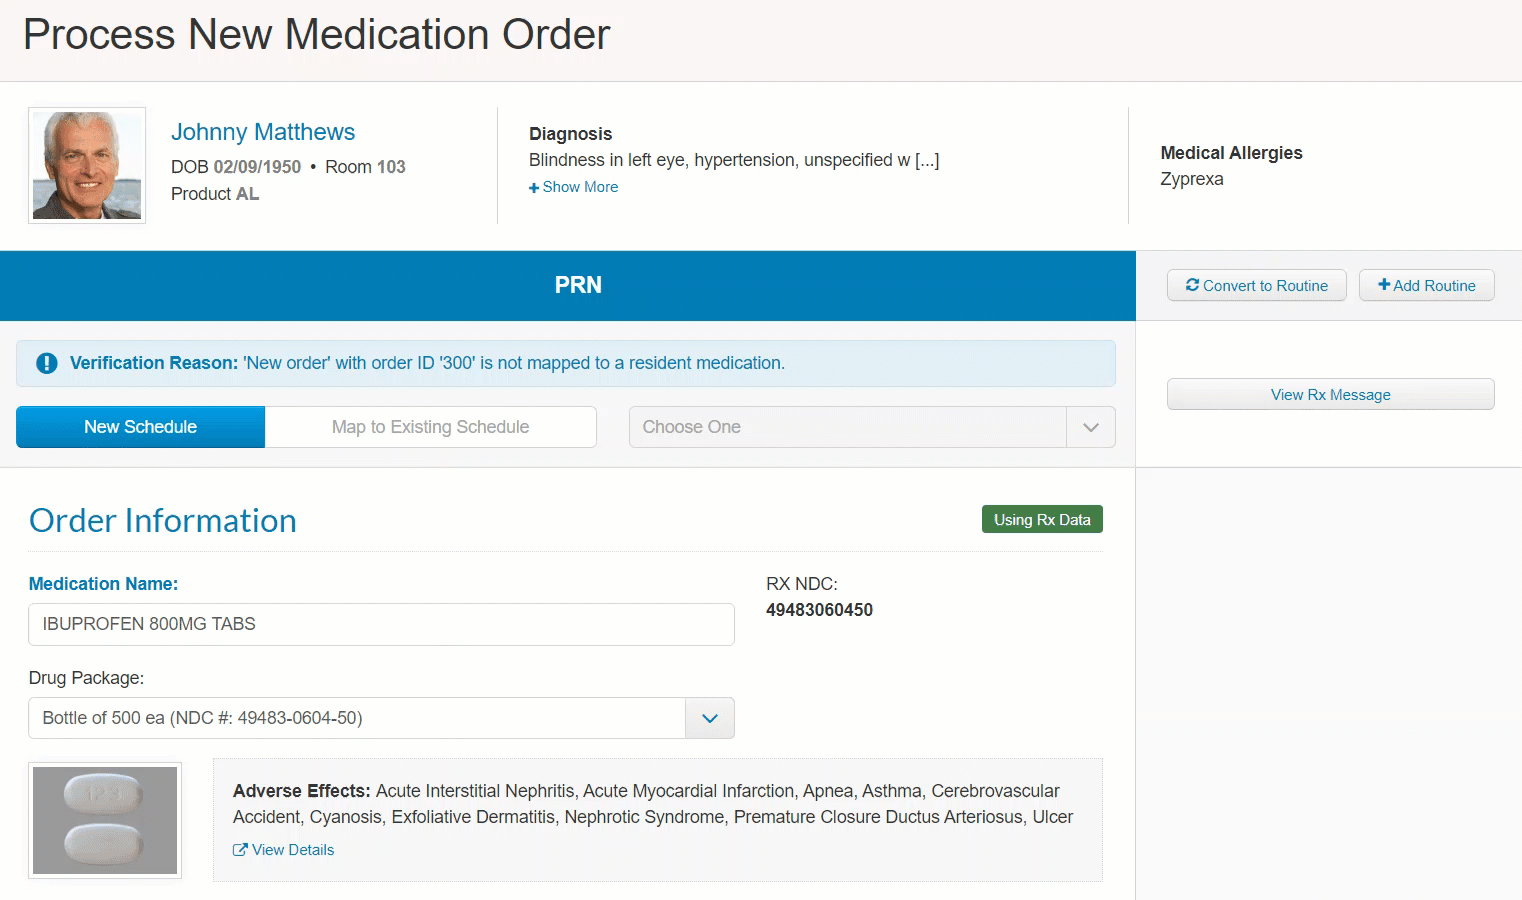
Order Information and Order Details
Required fields are the Medication Name, Route, and Instructions. The Order Details box is wedged between these fields, so you need to scroll past Order Details to see them all.
- Medication Name: This should be populated completely by the pharmacy, and there is likely no reason to update it. This includes the name of the order, the strength, and the form of the medication.
- RX NDC: The NDC number refers to a drug package within the National Drug Code Directory. This number allows for you to preview an image of the order and the adverse reactions. In order to see the image and adverse reactions based on this number, you must have the ALIS Drug Database feature turned on. For more information, read this article: ALIS Drug Database Reference Guide
- Drug Package: This should be populated by the pharmacy information, because it is determined by the NDC number.
- Equivalent to: The brand name equivalent of a generic medication goes here. This is likely to be populated by the pharmacy, and is meant to make it easy for med passers to know when they are working with a generic form of a brand name medication they may already be familiar with.
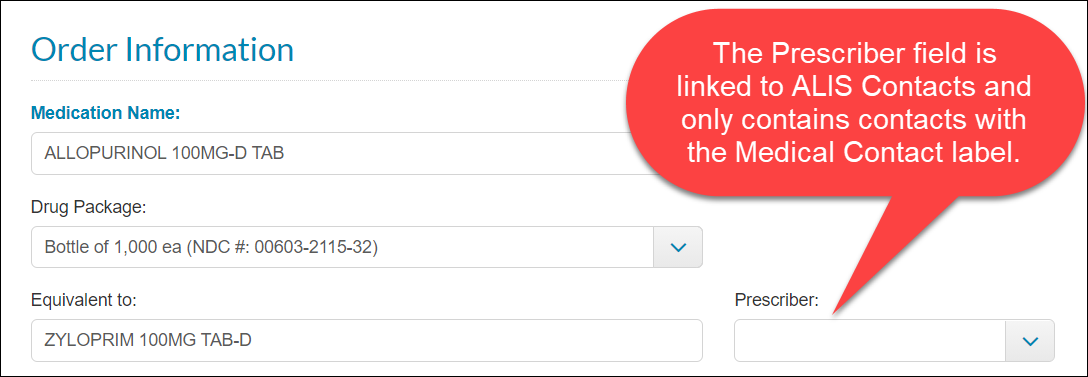
- Prescriber:This field does not pull information from the pharmacy message. It is likely that the prescriber's details were included in the code sent by the pharmacy, but this field is optimized to link the order to a resident's ALIS Contact. You can select any resident contact within your ALIS community who has been tagged as a 'Medical Contact' for any resident. This list should include primary care providers, nurse practitioners, and specialists. It is not possible to add a prescriber to this list from this page. If you need to add a prescriber to this list, go to the resident's profile and add the prescriber as a contact with the Medical Contact tag. If you come back to this refreshed page after adding the contact, the contact's name will appear in the list for you to select. Remember that this field is not required, so if that sounds like too much effort at the time, you can leave this field blank. For more information about resident contacts, check out this article: Resident Contacts Reference Guide
- Route: This menu is straightforward and likely to be populated correctly by the pharmacy code sent to ALIS.
- Instructions: Most likely you don't need to add anything to the text populated here from the pharmacy code. This is a completely editable field if you want to add more instructions. If you are adding a vitals check to the order (this is done in the Order Details box), add more instructions here detailing what med passers should do if the resident's vitals are outside of the safe ranges for the order.
Order Details
The information in this box is separate from the other Order Information fields because none of it can be populated with information from the pharmacy codes at this time.
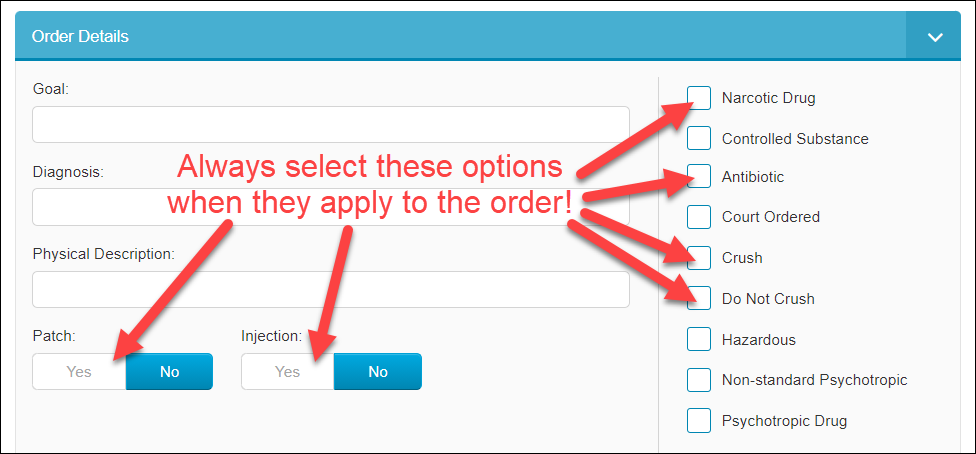
None of the fields here are required, but some may be very important to add text or click checkboxes pertaining to the order.
Even though editing this information is not technically required to process the order, it will display clearly on the Pass Meds page and on MAR and Physician Order documents.
- Goal: This field is not commonly needed. Enter here the physician's stated goal of the resident taking the medication.
- Diagnosis: This field populates the right column on the ALIS Physician Orders document next to each order. It is recommended to fill out the relevant diagnosis here for the order.
- Physical Description: This field is not commonly needed. Enter here the physical description of the medication.
- Patch: If the order is a patch that goes on the resident's skin, make sure you click Yes for this option! This will give you space to type a "General Location" that is not required or necessary. More importantly, further down the page in the dose area, you can select the steps of whether the scheduled time is meant for applying, removing, or replacing the patch. In the Med Pass, this requires the med passer to type the patch location on the resident's body, and shows med passers the previous location of the patch.
- Injection: If the order is an injection, make sure you click Yes for this option! This will give you space to type a "General Location" that is not required or necessary. In the Med Pass, this requires the med passer to type the injection site on the resident's body, and shows med passers the previous injection site.
- The checkbox labels on the right column of the Order Details section should be reviewed carefully, and you should check all that apply to the order. These will display as prominent badges next to the order, and can be used to filter all of your orders in reports. The standard options are listed here, but they can be customized if you want to add or remove some. In bold are the most commonly useful of these labels:
- Narcotic Drug, Controlled Substance, Antibiotic, Court Ordered, Crush, Do Not Crush, Hazardous, Non-standard Psychotropic, Psychotropic Drug.
- Narcotic Drug, Controlled Substance, Antibiotic, Court Ordered, Crush, Do Not Crush, Hazardous, Non-standard Psychotropic, Psychotropic Drug.
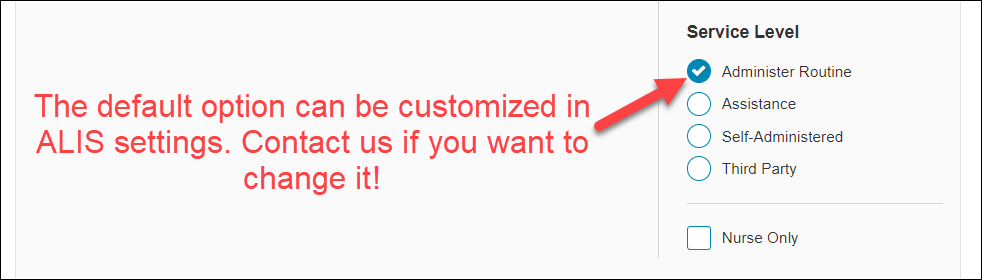
- Service Level: The default level is Administer, but we can update the default level for your building in Settings. If you need us to change this, contact ALIS Support.
- Administer: This option is appropriate for most orders under most building licenses, with the exception of buildings in Florida.
- Assistance: This is an alternative to Administer for Florida licenses.
- Self-Administered: Mark this option for residents who administer their own medication. When you select this option, you can then choose whether the order should show on the MAR document and/or the Med Pass. The most common practice for this is to check Show in MAR, but uncheck Show in Med Pass.
- Third Party: This has the same options as Self-adminstered. Most likely you want the order to show on the MAR, but not in the Med Pass, since third party providers typically do not have access to ALIS and maintain their own MAR tool.
- Nurse Only: This is only available if you have Administer selected above. For more information about Nurse-give Only medications, check out this article: Nurse-Only Orders
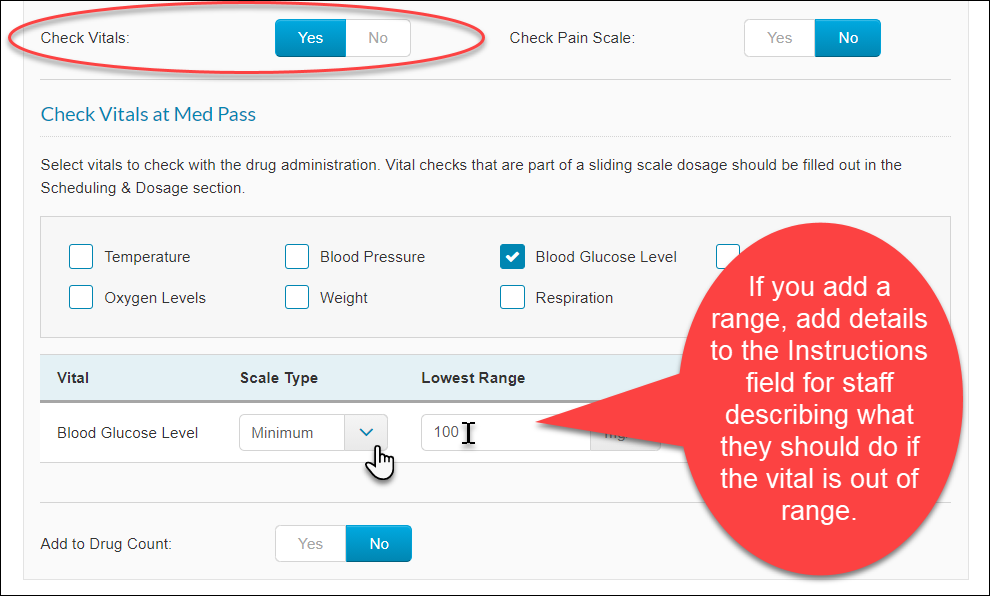
- Check Vitals: When you click yes for this option, you can then select vitals required to be recorded before this order can be administered. When you click the checkbox next to a vital type, you can then optionally select a "Scale Type" which indicates whether there is an acceptable upper, lower, or upper and lower range for the vital. If you add a scale type range of any kind, it is recommended to add details to Instructions a description of what med passers should do if the vital is recorded outside of the range. For more information about vitals in ALIS, read this article: Recording Vitals
- Check Pain Scale: If you switch this to Yes, the med passer is required to select from 0-10 to indicate the resident's reported pain level.
- Drug Count: If you have the Drug Count turned on, this option will be available. When you click Yes, you will be required to add the current quantity of the order on hand or link the quantity to another order for this resident. For more information about enabling the drug count for an order, read this article: Enabling medications for the Drug Count
Routine Orders: Scheduling & Dosage
Most likely all required fields in this section are filled out perfectly by the codes ALIS receives from the pharmacy. Required fields are Drug Unit of Measurement, Start Date, Interval, Dosage Type, Dose, and Time.
- Drug Unit of Measurement: This is a long list of possible order unit abbreviations that the pharmacy might use. By far the most common option is TABS, for tablet. Any time you change this field, notice that the Dose field below will reflect the change.
- Packaging: Most likely you want to leave this alone. This menu affects orders tracked in the ALIS Drug Count that are packaged as partial pills in a bubble package. It is a very rare situation that you will need to change this menu from Based on Dose (default) to As 1 Packed Unit.
- Min. Interval Between Admins: It is not recommended to use this menu for Routine Orders, because they are always scheduled for specific days and times. This is very useful for PRNs however. This allows you to select up to 72 hours within 30 minute increments. This is the length of time between administrations that the resident can safely be given the order. The order will show the label 'WAIT' if it is too soon to give the order based on your selection in this menu.
- Start Date: This date can not be edited later, unlike almost everything else on this page. Most likely the date the pharmacy has here is appropriate.
- End Date: If the order schedule should stop at a specific date and time, make the selection here. This might apply for antibiotics or tapering dose orders. The order will automatically Discontinue at this date, and this field should remain blank for most orders.
- Interval: This determines which days after the start date an order is scheduled on the Med Pass. If you are unsure if you have scheduled the order for the appropriate days based on this, you can always review the resident's MAR after processing to make sure it is scheduled to be given on the intended days. If you need to change this menu later, it is editable from Manage Orders.
- Dosage Type: Almost all orders will be "Fixed". Range dosages are rarely used for Assisted Living, and indicate the resident can basically choose the dosage they want within a range you set. Sliding Scale is used by some communities mostly for the purpose of administering a specific number of insulin units based on the resident's blood glucose level. For more information about sliding scale orders, read this article: How do I add a sliding scale vitals check to a medication order?
- Dose: The number of units given at the times specified below, units being determined by the above-mentioned Drug Unit of Measurement. Select "Dose is different per time" if the order is given at multiple times in different amounts.
- Time: First you must select one of four time range options, and then you can select a specific time. If you need to edit the specific times available within the time ranges for your community, contact ALIS Support. To add additional times, click the green plus sign!
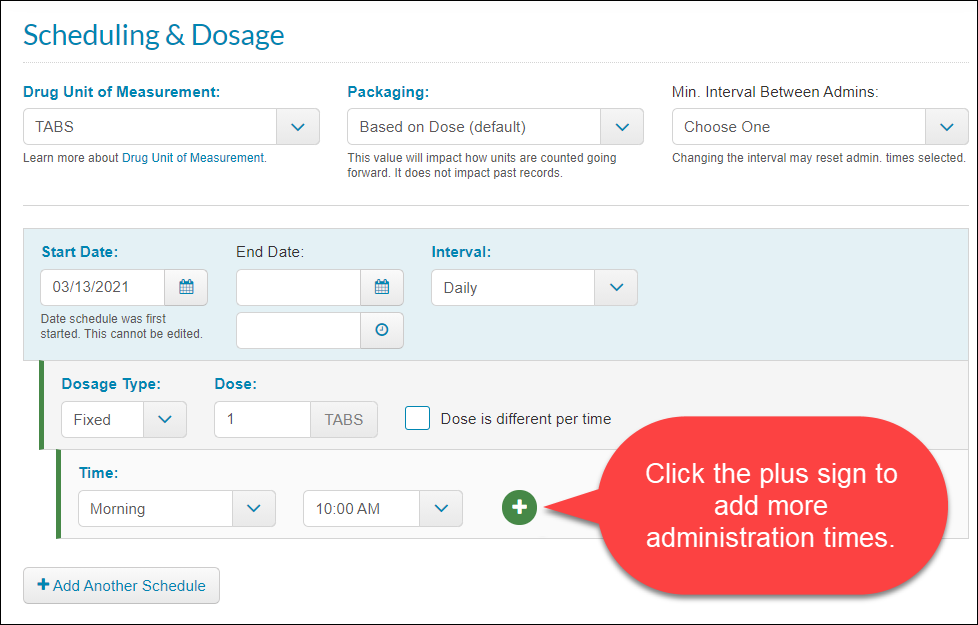
- The "+Add Another Schedule" button creates a new section for a different schedule with different instructions and start and end dates. This may be used for alternating dose orders or tapering dose orders, but do not use this for adding another administration time for a simple order. (How to enter a tapering dose medication, How to enter an alternating dose medication)
PRN Orders: Administration & Dosage
This contains nearly all the same fields as the Scheduling & Dosage section for routine orders. There are two additional fields:
- Max. Admins. in 24 Hours: Select the number of times per day it is prescribed to administer this order.
- Check and Record Outcome: This is an important step to select for your PRNs if you are tracking the outcomes of administering PRN orders. For most orders it is appropriate to select 1 hour, but some medications may take effect very quickly and others after several hours. For the time length you select here, ALIS will require an outcome entry from your med passers. If the outcome time length expires, the PRN outcome will be considered overdue.
It is a good idea to utilize the Min. Interval Between Admins. menu together with the Max. Admins. in 24 Hours menu! It depends on the instructions of the order, but these will both be relevant if an order can be given every 2 hours, but only a maximum of four times per day.
Med Pass Scheduling Information
Unless advised by your onboarding manager, do not update the fields here. Ignore this section entirely!
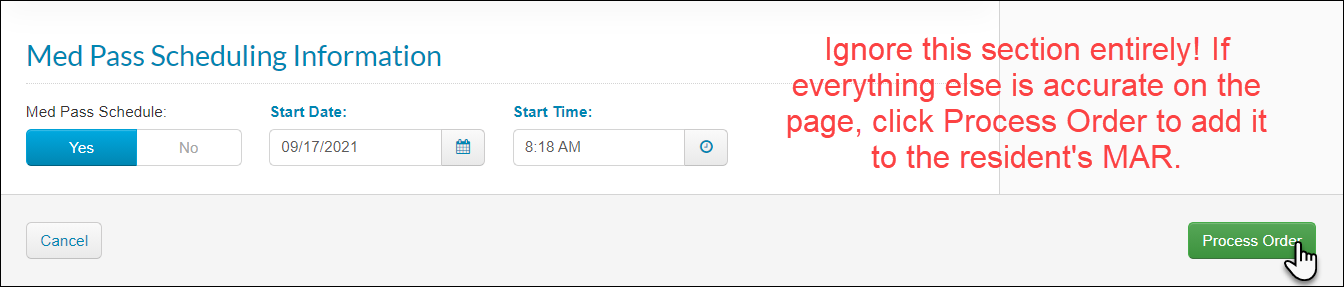
Click Process Order
Once you review the details of this page, click the green Process Order button. This won't work if there are any unfilled required fields.
Mapping Pharmacy Messages
This guide overviews how we can replace an existing order on a resident's MAR with a new message we have received from the pharmacy. Doing this prevents the creation of duplicate orders on a MAR, and allows us to connect the most recent order in the pharmacy's system to the MAR in ALIS. Mapping a pharmacy message results in the order message replacing a current order on the MAR. Once the mapping is processed, the existing order is discontinued and replaced by the most current order sent by the pharmacy.
How to Map a Pharmacy Message
- Find the order message you need to map, and click the Process button.
- Near the top of the page under the resident information, click Map to Existing Schedule. This makes available a dropdown menu to the right. In this menu, we have all the resident's existing orders of that type (whether routine or PRN medication) that are currently on their MAR. Select the order we want to map.
- This will now give us a panel on the right side of the screen titled Existing Order. This is where we can see the details of the order we are replacing. It is a good idea to click the button Use Data near the top, so that any information added on that current order will be part of the order ware replacing it with.
- A good way to think about it is that the main part of your screen is the order the pharmacy has, and we are using this to replace the order showing on the right panel. We need the info in the main part of the screen to be filled out so that the MAR reflects all the necessary information about this order.
- Once you have confirmed the information on the main center section of the screen is complete, click the green Process Order button at the bottom right.
Once this is processed, the order is no longer displaying on the Pharmacies page in ALIS, and the resident's MAR now reflects a version of the order most recently updated by the pharmacy, and we have prevented duplicates!
Comments
0 comments
Please sign in to leave a comment.