How to Manage ALIS Alerts
ALIS Alerts allow us to customize important notifications for staff. Alerts can be read within the ALIS Alert Center, sent to the staff member's email, and sent as text messages, and the subscriptions can include a range of events categories (medications, billing, etc.).
Each alert includes a link to a relevant page in ALIS so that you can easily login and review the relevant information.
For information about customizing your alert events categories, read this article: Alert Settings
Alerts are setup for you and your staff for each individual community you are associated with. If you or your staff need alerts for multiple communities, these must be managed separately for each community by updating the Community selector. For help copying your alerts subscriptions from one community to another, contact us!
Managing your own alerts
- Access your My Account page and click the Preferences tab.
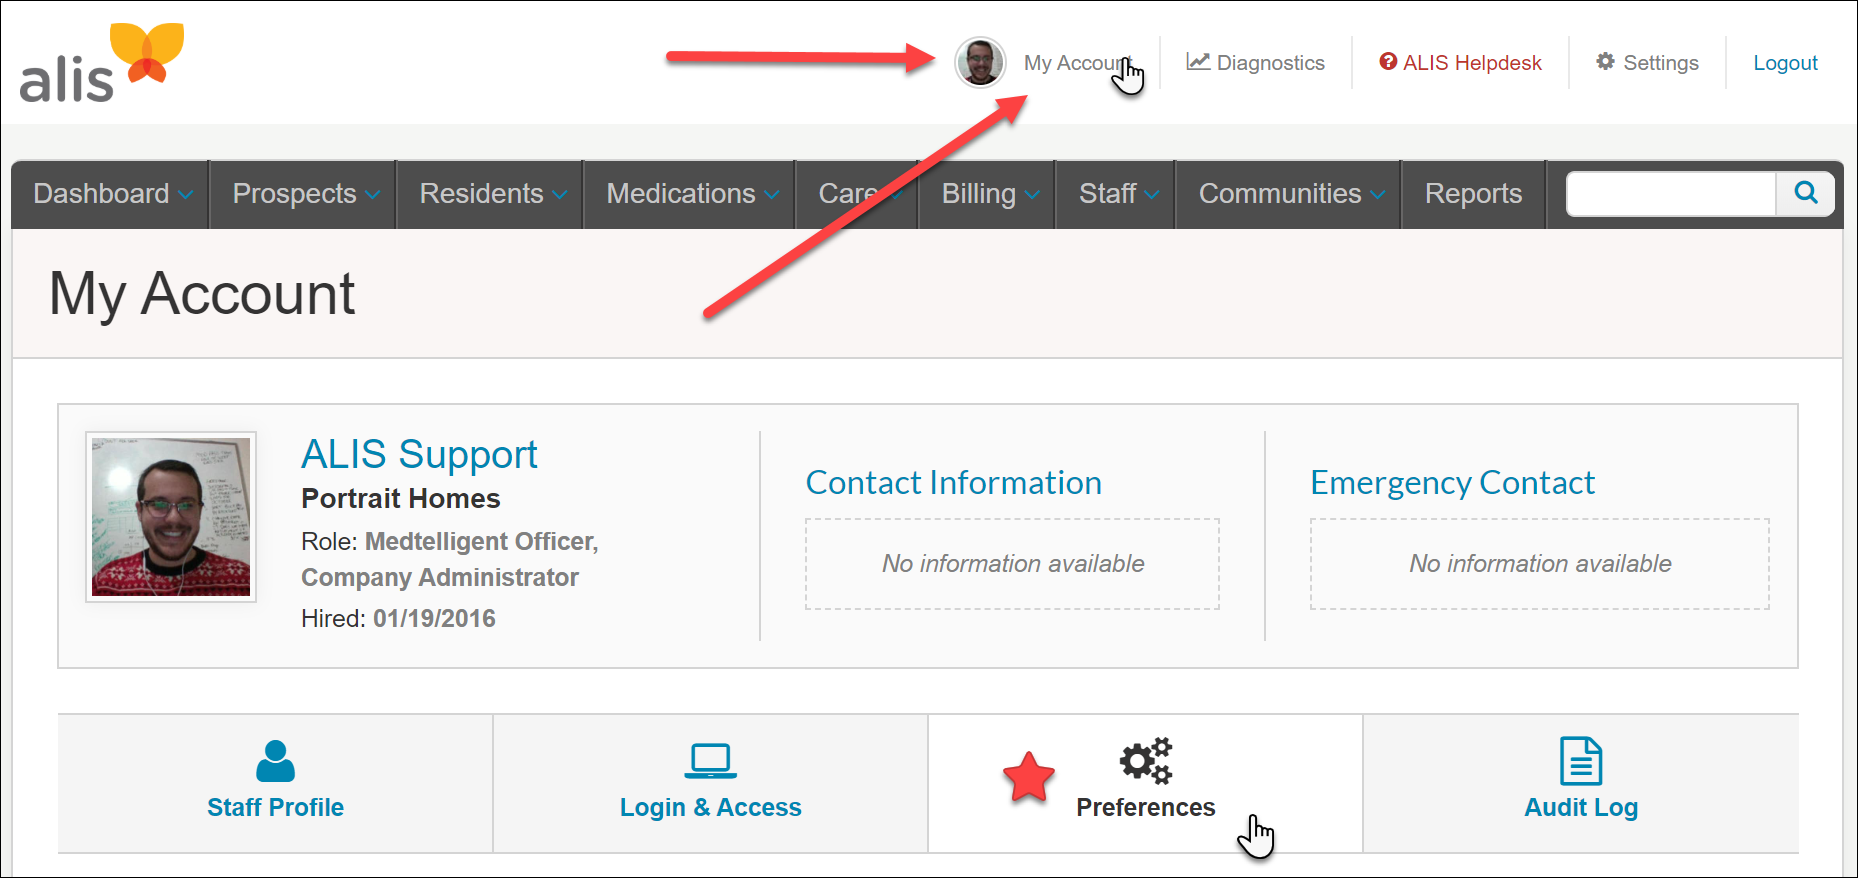
- Click the Manage Alerts Preferences button in the Alerts tab.
- This opens a pop-up where we will configure each subscription we want to receive, and how we want to receive it.
- Daily Digest refers to one email you receive each morning to see all of the previous day's alerts. Select all categories you wish to receive this way.
- Real-time Emails are sent to you momentarily after one of the events within the category occurs. These are useful for urgent alerts such as incidents.
- Real-time Texts are used similar to the Real-time Emails. Select categories for this that are urgent for you to receive.
- Categories selected to be received for any of the other subscription options will also go to the ALIS Alert Center. Select this option for any categories you only want to read in the Alert Center.
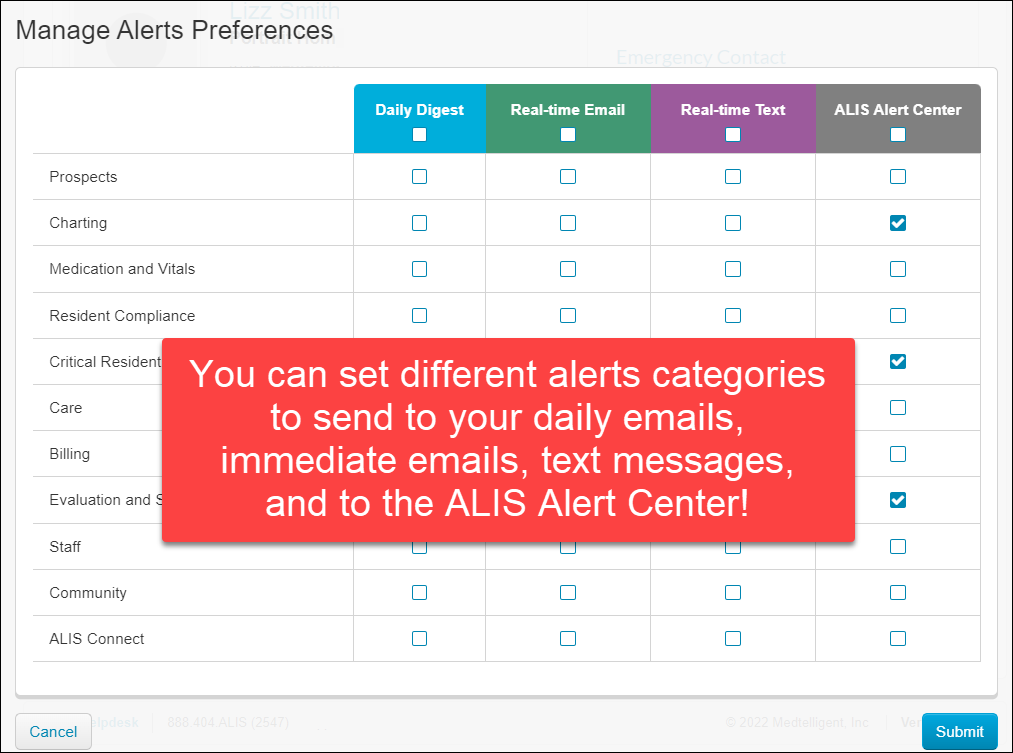
- Click Submit at the bottom right to begin receiving the alerts!
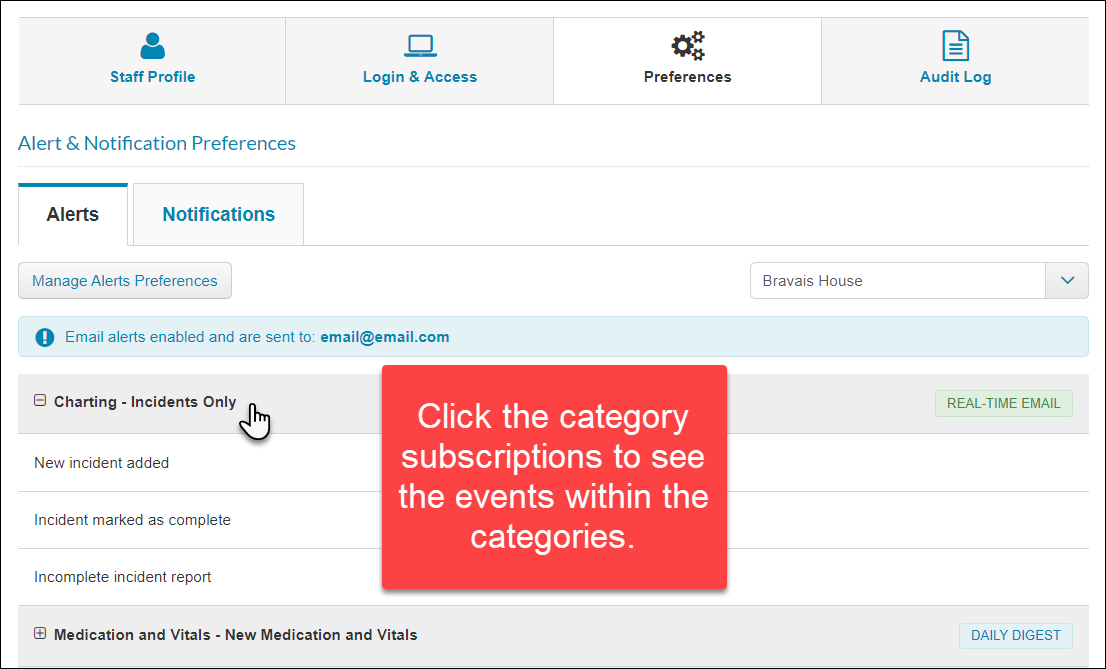
The easiest way to see which events are included in the different categories is to review them after you subscribe. Once subscribed to a category, it displays in the Alerts tab where you can click the category name to view the included events. If you need to edit the events included in a category, this is updated in Alert Settings.
Managing your staff's alerts
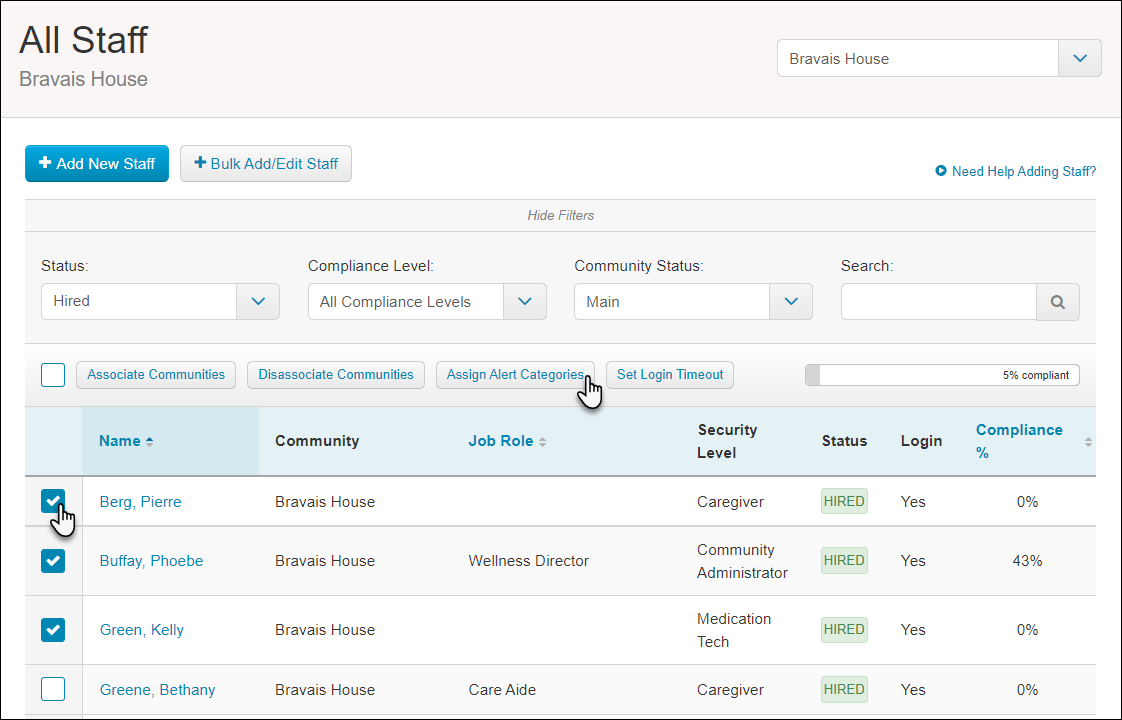
- You can subscribe staff to categories received in the ALIS Alert Center in bulk from the All Staff page.
- Click the checkboxes to the left of the staff members' names.
- Click the Assign Alert Categories button above the list of staff.
- In the pane on the right, select the categories you want to assign the selected people.
- Click Assign Alerts at the bottom of the pane.
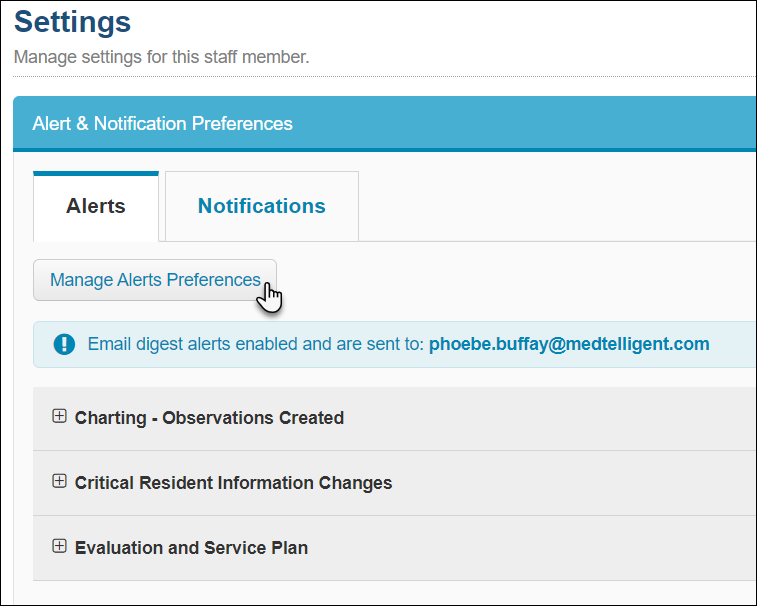
- For more nuanced alert setup involving the other ways staff can receive alerts, access the staff member's profile.
- Scroll down to the Settings section, and click the blue bar to open the section called Alert & Notification Preferences. Click Manage Alerts Preferences and follow steps 3 and 4 in the above section to complete the subscription.
ALIS Survey Guide
Don’t panic, the information is at your fingertips! Use this guide for advice on how to prep for your next survey and how to export your data from ALIS.
Planning for your next survey
- Create a clear policy that states what items must be included in a resident's ALIS chart. Not everything recorded in ALIS needs to be viewed by a surveyor! A policy helps prevent exposing informal notes and charting details.
- Create an agenda for your survey process. Include who should be notified immediately, where the surveyor should work, what computer they should use (if applicable), how to give them access to ALIS (if applicable), and how to print most commonly asked-for items.
- Make sure a community representative is present with your surveyor to print or provide copies as needed.
- Plan to give them access to ALIS. Our recommendation is to not give a state surveyor access to ALIS if it can be avoided. Our recommendation is to instead print the information they request. However we acknowledge that not all surveyors will allow this, so it is a good idea to be ready!
- Discuss what you want your surveyor to access with the ALIS team. We can then create the appropriate Security Role for your surveyor.
- Once we have created the role, we can create a login with a generic username and password for them to use.
- On the day of a survey, ALIS offers unlimited surveyor support!Please contact your ALIS onboarding team or the ALIS support team for help during your survey. Email support@medtelligent.com or call 888.404.ALIS (2547).
The rest of this guide outlines how to print the most commonly-requested items from ALIS.
Print nurse’s notes (Observation Center)
Start by using the filters in the Observation Center to display the information you need.
- Use the Observation Type filter to select Nurse's Notes.
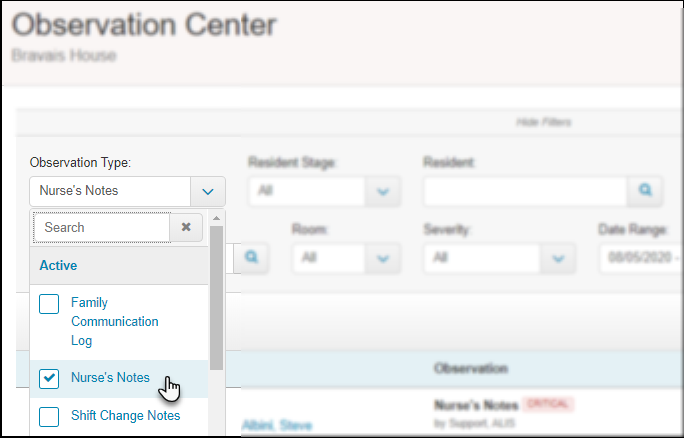
- To narrow the search to only one resident, begin typing their name in the Resident filter and click on it. Click the magnifying glass button. Skip this step if you want to print notes for all residents.
- Use the date range filter to look at the notes for a specific length of time.
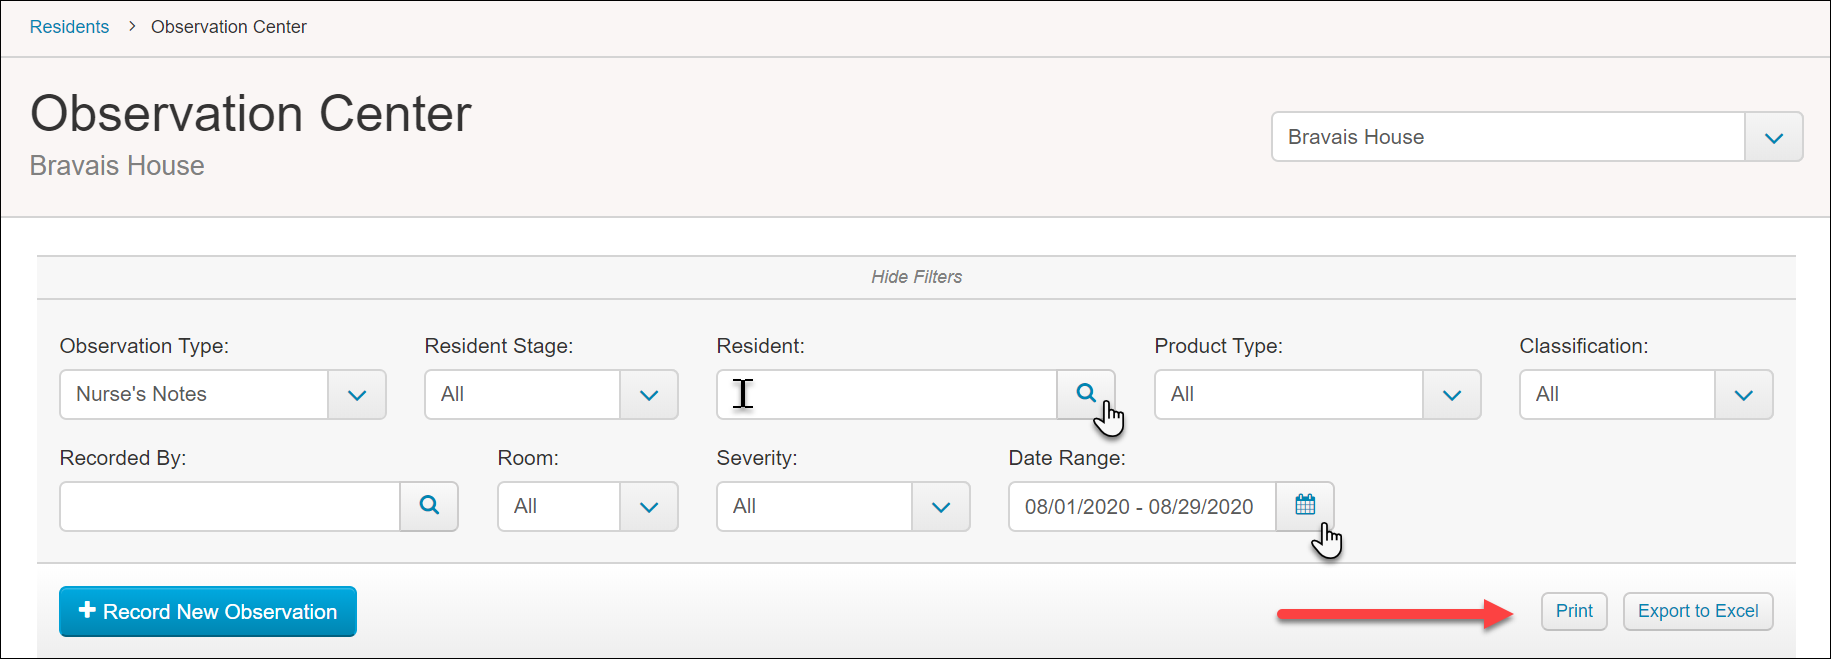
After you have adjusted filters, verify the correct notes are displaying in the table below. Click the Print button located on the right below the filters and above the notes.
Print Incident Reports
The ideal practice for incident reports is to Export and print all completed state-reportable Incident Reports as soon as they aredone. If you have a physical file of all state-reportable Incident Reports on hand, the stress related to incidents and documentation is completely relieved before you even know you are being surveyed! Keep completed state-reportable Incident Reports in a physical folder in preparation for anyone requesting these in the future.
You can alleviate a lot of survey stress by reviewing your current process and solidifying your policy on how incident reports are created. This will help you avoid having to face a list of old uncompleted reports when the time comes. Contact your account manager, onboarding manager, our ALIS Support for help with this preparation!
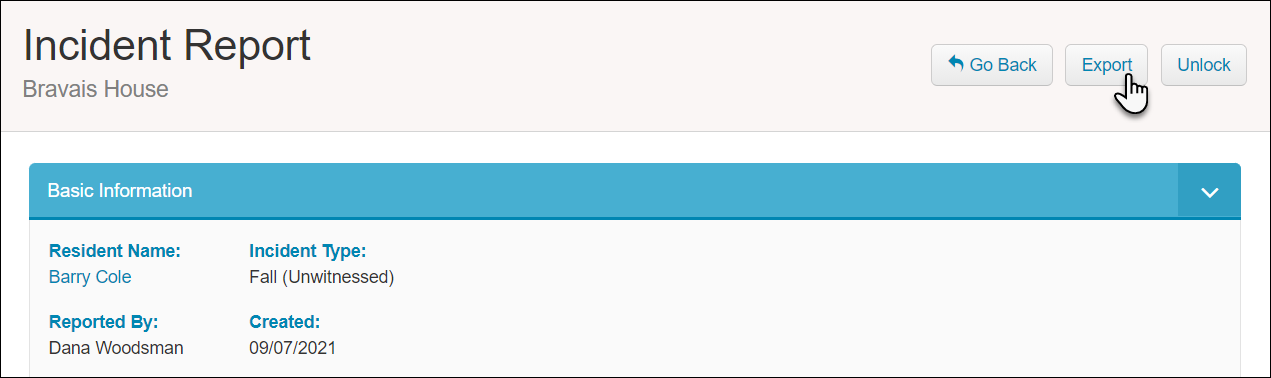
Exporting an Incident Report:
The Export document will include all completed forms and task details.
- Go to the Incident Center and use the filters to find the report you need to export. You may need to update the date filters, resident name, or incident type filter.
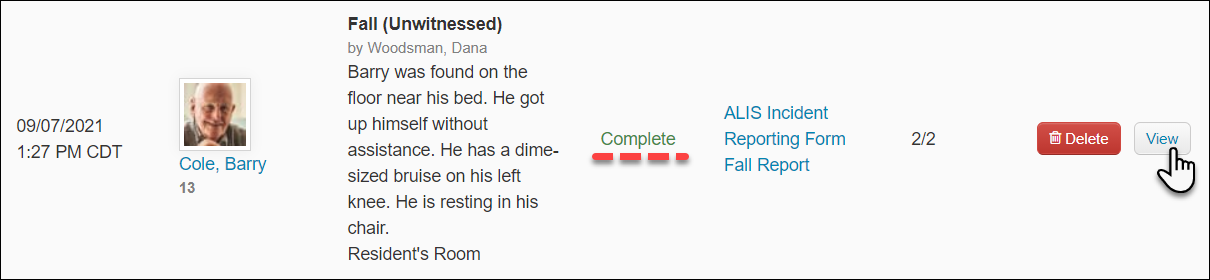
- For each Incident Report you need to print, click the View button to get to the incident details page.
- If the Incident Report has not been marked completed, there may be an Edit button instead.
- If the Incident Report has not been marked completed, there may be an Edit button instead.
- Once you are on the incident details page, click the Export button, and print the document!
- Before you Export, make sure all necessary details are completed. This includes clicking the Complete button next to all forms!
- Before you Export, make sure all necessary details are completed. This includes clicking the Complete button next to all forms!
Print Physician Orders
- Click Medications > Manage Orders in the menus at the top of the page.
- Click the button that says Print Current Physician Orders. These documents will contain all active orders.
This will open a pane on the right for you to select options.
- To print orders for multiple residents or all residents, keep the Multiple Orders options highlighted blue.
- To print POs for all residents, keep the Resident menu set to All. For printing POs for specific people, click the checkboxes next to their names in the menu.
- You can also filter using the Med Cart and Product Type filters to gather POs for groups of residents.
- Click the Print button to generate a file containing all POs for the selected residents. Review this and print as needed.
The Print All Physician Orders button on Manage Orders provides a way to generate POs containing all orders active within a specified date range. This option requires you to enter an Order Date Range, and then you can filter for specific residents, Med Carts, or Product Types. Orders that have since been discontinued will display with a clear "discontinued" label.
You can also print POs for a single resident from here. If you select Single Resident, you choose the resident name, and then you will then also have the option to Select Meds to Print. When Select Meds to Print is highlighted blue, you can use the Select Meds menu to include specific orders grouped by Prescriber name.
POs can also be printed for individual residents by accessing their specific Manage Orders pages. Read this article for more information: Manage Orders.
Print MARs
- Click Medications > Manage Orders in the menus at the top of the page.
- Click the button that says Print Filled MARs. These documents will contain all orders within a single selected month.
- This will open a pane on the right for you to select options.
- To print MARs for all residents, keep the Resident menu set to All. For printing MARs for specific people, click the checkboxes next to their names in the menu. You can also print a MAR document for a single resident from here.
- You can also filter using the Med Cart and Product Type filters to gather MARs for groups of residents.
- Select the Month and Year for which you need the documents. If you need multiple months, you will need to complete this process and print on month at a time. Read on for more details about printing previous month's MARs.
- When you generate MARs from here, they do not automatically contain Exceptions, Med pass notes, Injection sites, or Vitals checks. Click the checkboxes next to these items in order to include these details.
- Click the Print button to generate a file containing all MARs for the selected residents. Review this and print as needed.
The Print Unfilled MARs button will generate MAR documents that do not contain administration records. They will include resident names and order details only.
You can generate a MAR for more than one month at a time on a specific resident's Manage Orders page. Click the Past MARs button. This will create a pop-up that allows you to multi-select the months that the resident has been in ALIS and print.
Read this article for more information about Manage Orders.
You can also access a resident MAR for the current month by clicking the Current MAR button on a resident's profile below their photo.
Print Advance Directive or DNR status
The resident’s Advance Directive status tag displays on their Resident Profile page, on the Manage Orders, Pass Meds, as well as most other parts of ALIS. This tag displays on the ALIS Face Sheets, Physician Orders, MARs, Evaluations, and Care Plan documents.
To print the Advance Directive status tag for All Residents:
- Advance Directive status is captured on several Resident reports, including the Resident Roster and the Resident Checklist.
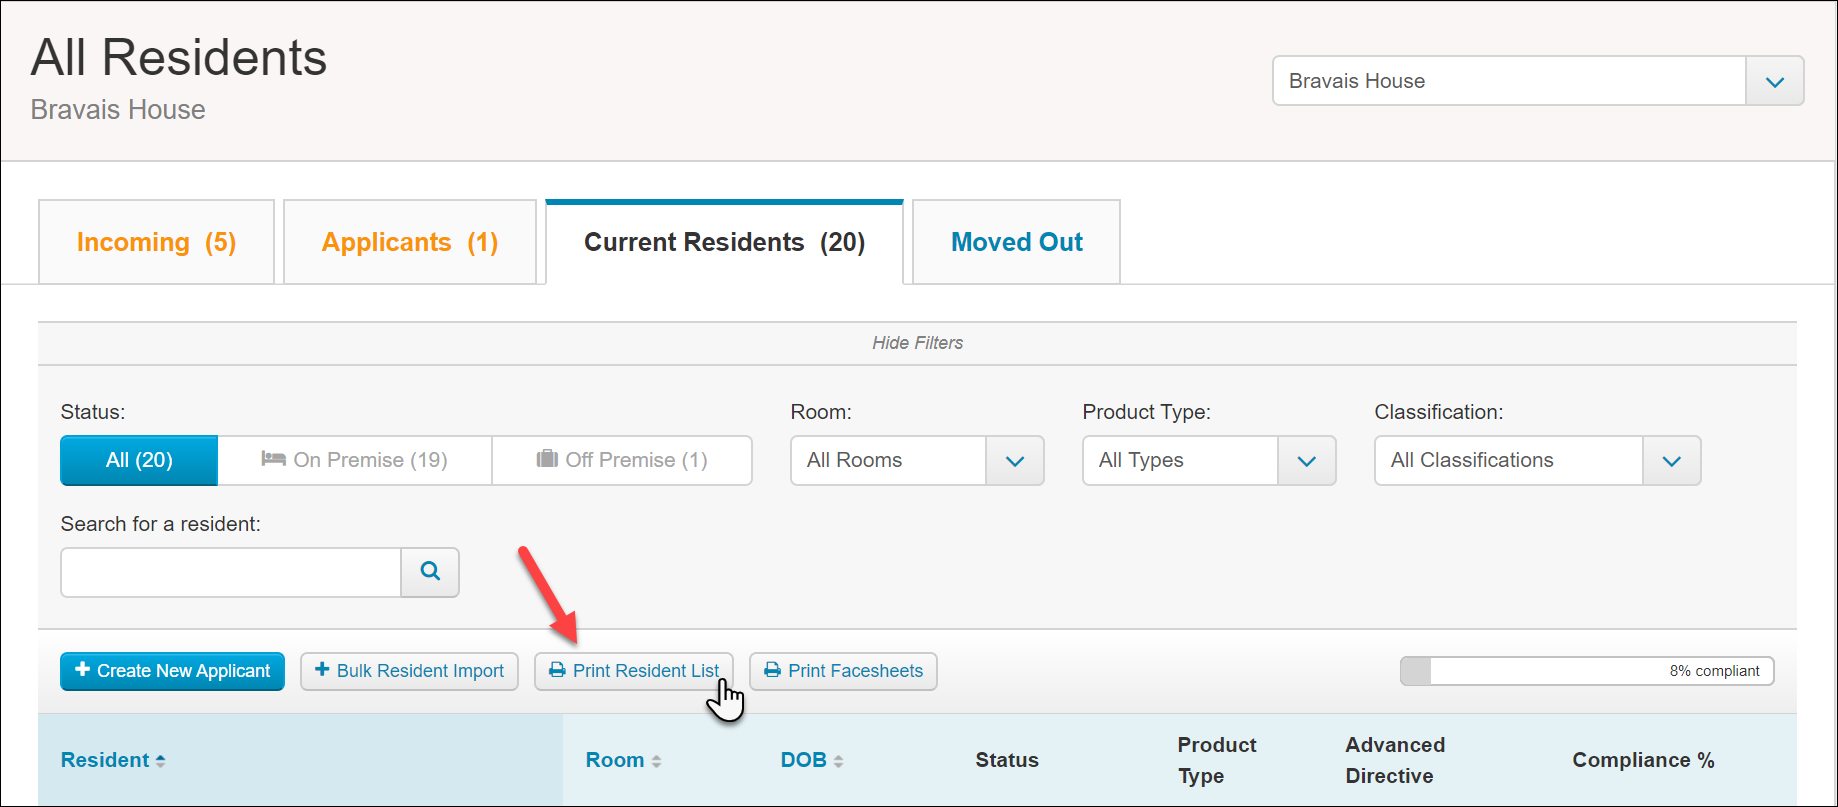
- The easiest way to print out the Advanced Directives is to visit the All Residents page. When you land on this page, the Current Residents is in focus. Click the Print Resident List button near the middle of the page above the list of residents. When you click this, a printable PDF document generates to show you a handful of useful details regarding the resident’s status, the second column from the right being the Advance Directive status.
If you are maintaining an Advance Directive document in the resident's Compliance Documents, the easiest way to export this either from the Compliance section of the resident profile (click the link in the File Location column for this item). 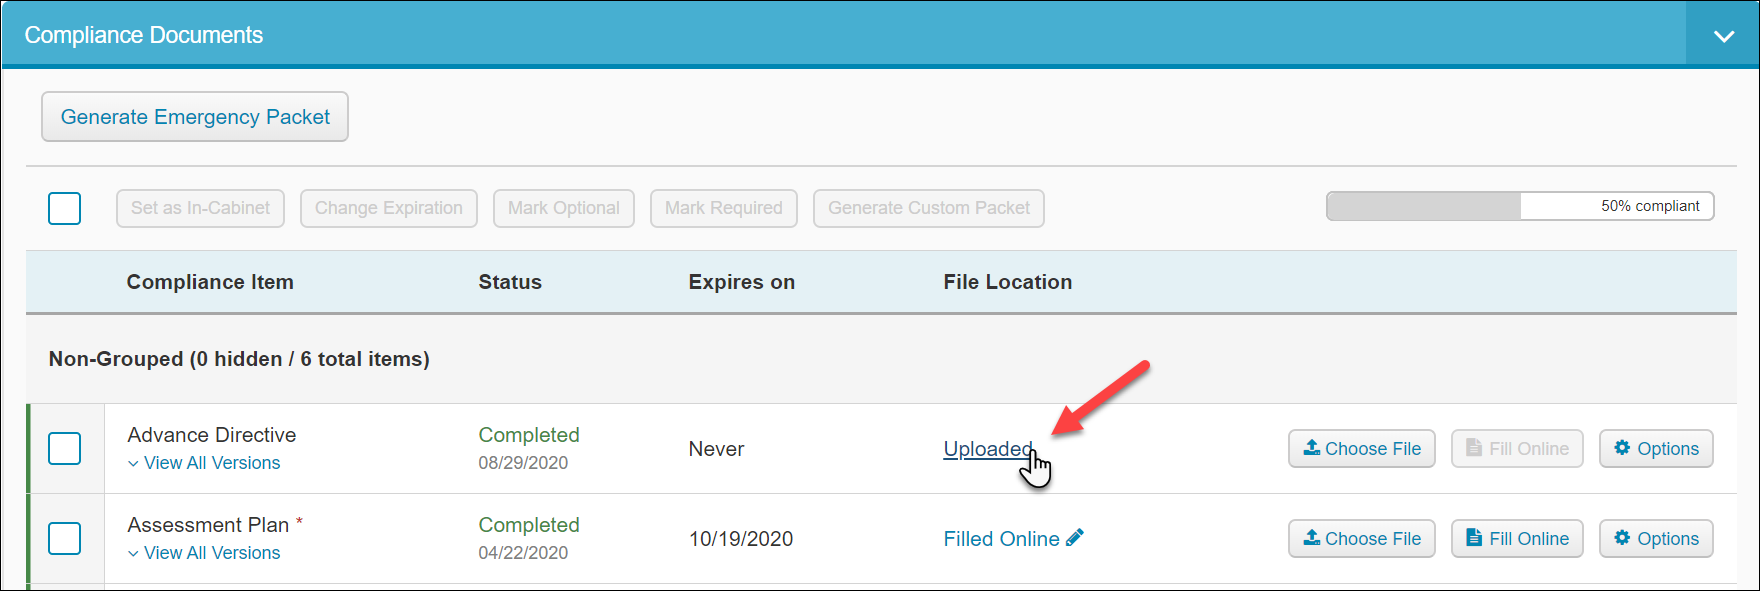 To print a compliance item for all residents, use the Resident Compliance Details report. In the Reports page, find the Resident Reports section and click Compliance Details. Here we can use the Compliance Item filter to find the Advance Directive item, click the blue Refresh button, then use the Print Compliance Documents button to download a folder of all documents onto your computer for viewing or printing.
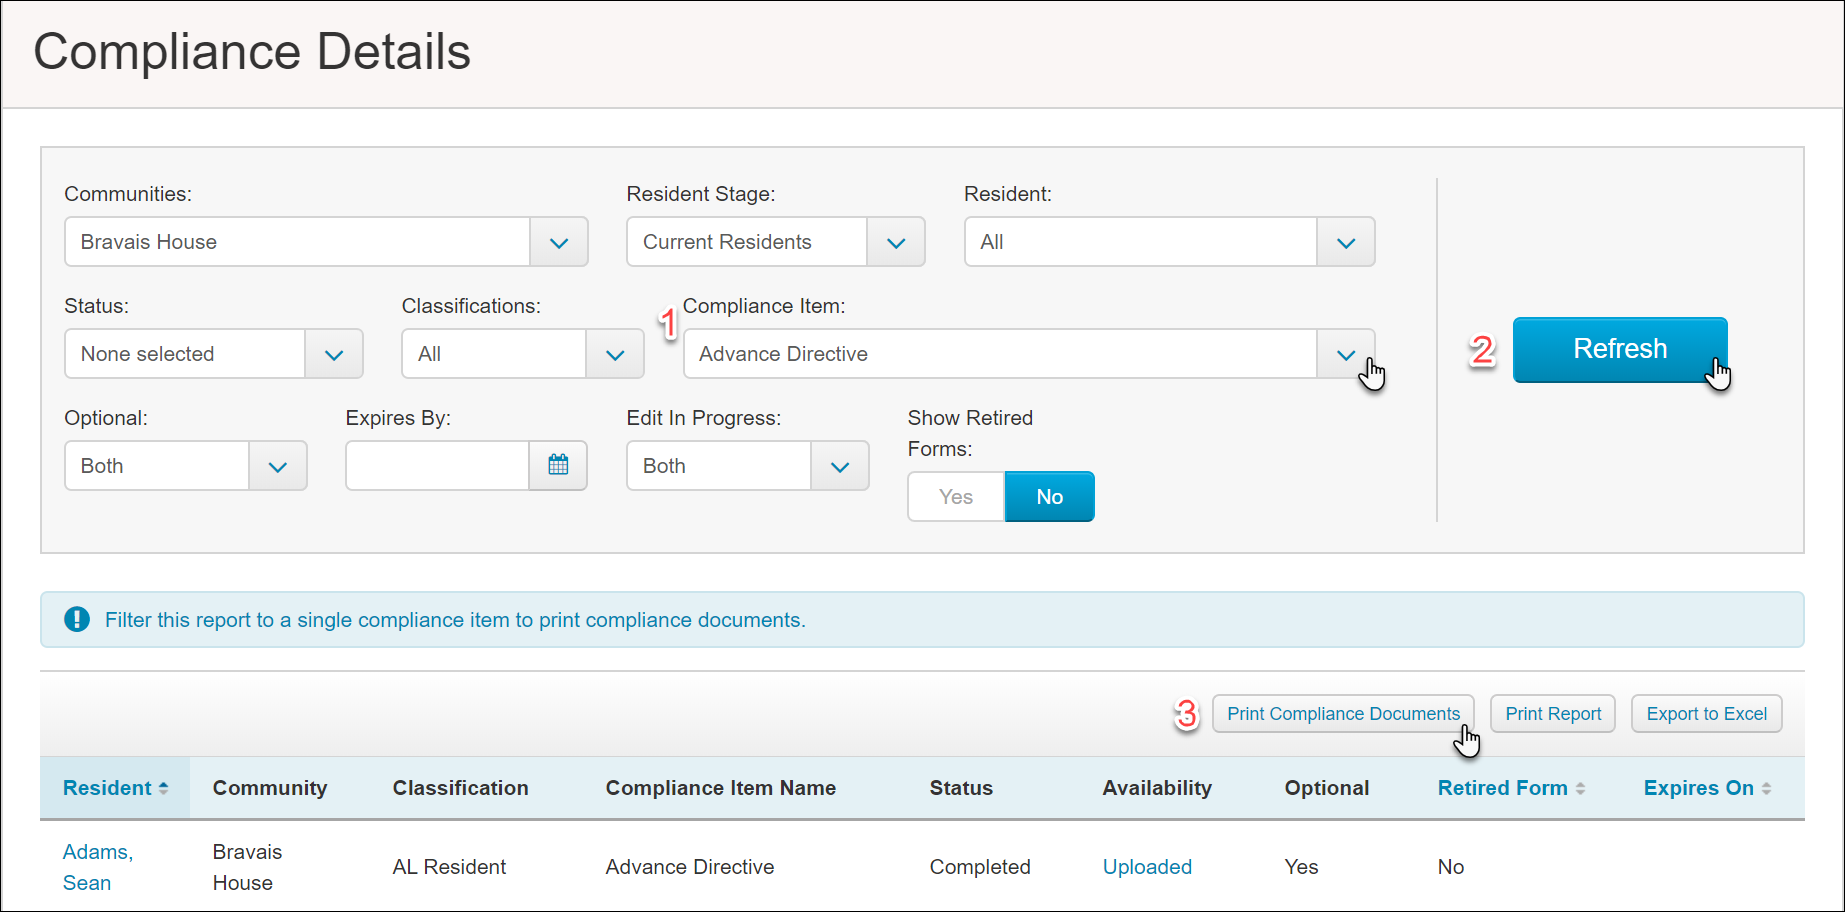
Print ALIS Facesheets
The easiest way to print Facesheets is from the Print Center.
- Access the Print Center from the Care menu at the top of your page in ALIS.
- Click the Download button in the Face Sheets sheets section.
- This will open a pane on the right with filters for Product Type and a list of residents you can multi-select.
- Once you click Download, a printable PDF document including all the Facesheets will generate.
You can also generate Facesheets for all residents from the All Residents page. Click the Print Facesheets button toward the middle of the screen above the resident list. When you click this, a pop-up will ask if you want the document of all Facesheets sorted by Last Name or Room Number. Once you click Submit, a printable PDF document including all the Facesheets will generate. 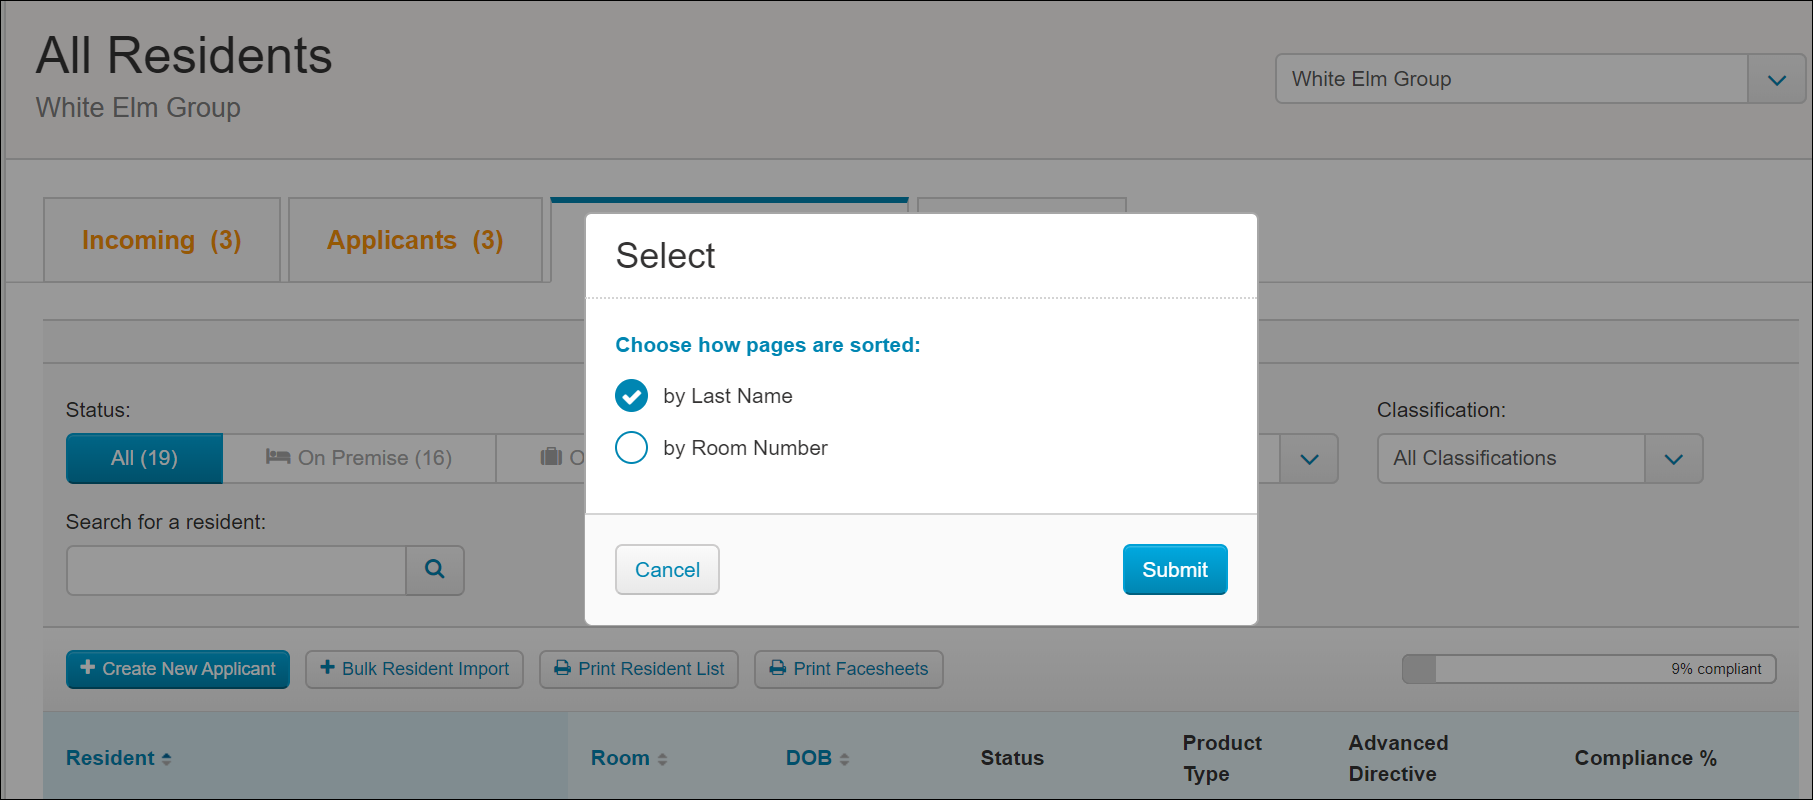
To print a compliance item for all residents, use the Resident Compliance Details report. In the Reports page, find the Resident Reports section and click Compliance Details. Here we can use the Compliance Item filter to find the Facesheet item, click the blue Refresh button, then use the Print Compliance Documents button to download a folder of all documents onto your computer for viewing or printing.
Print Vitals Records
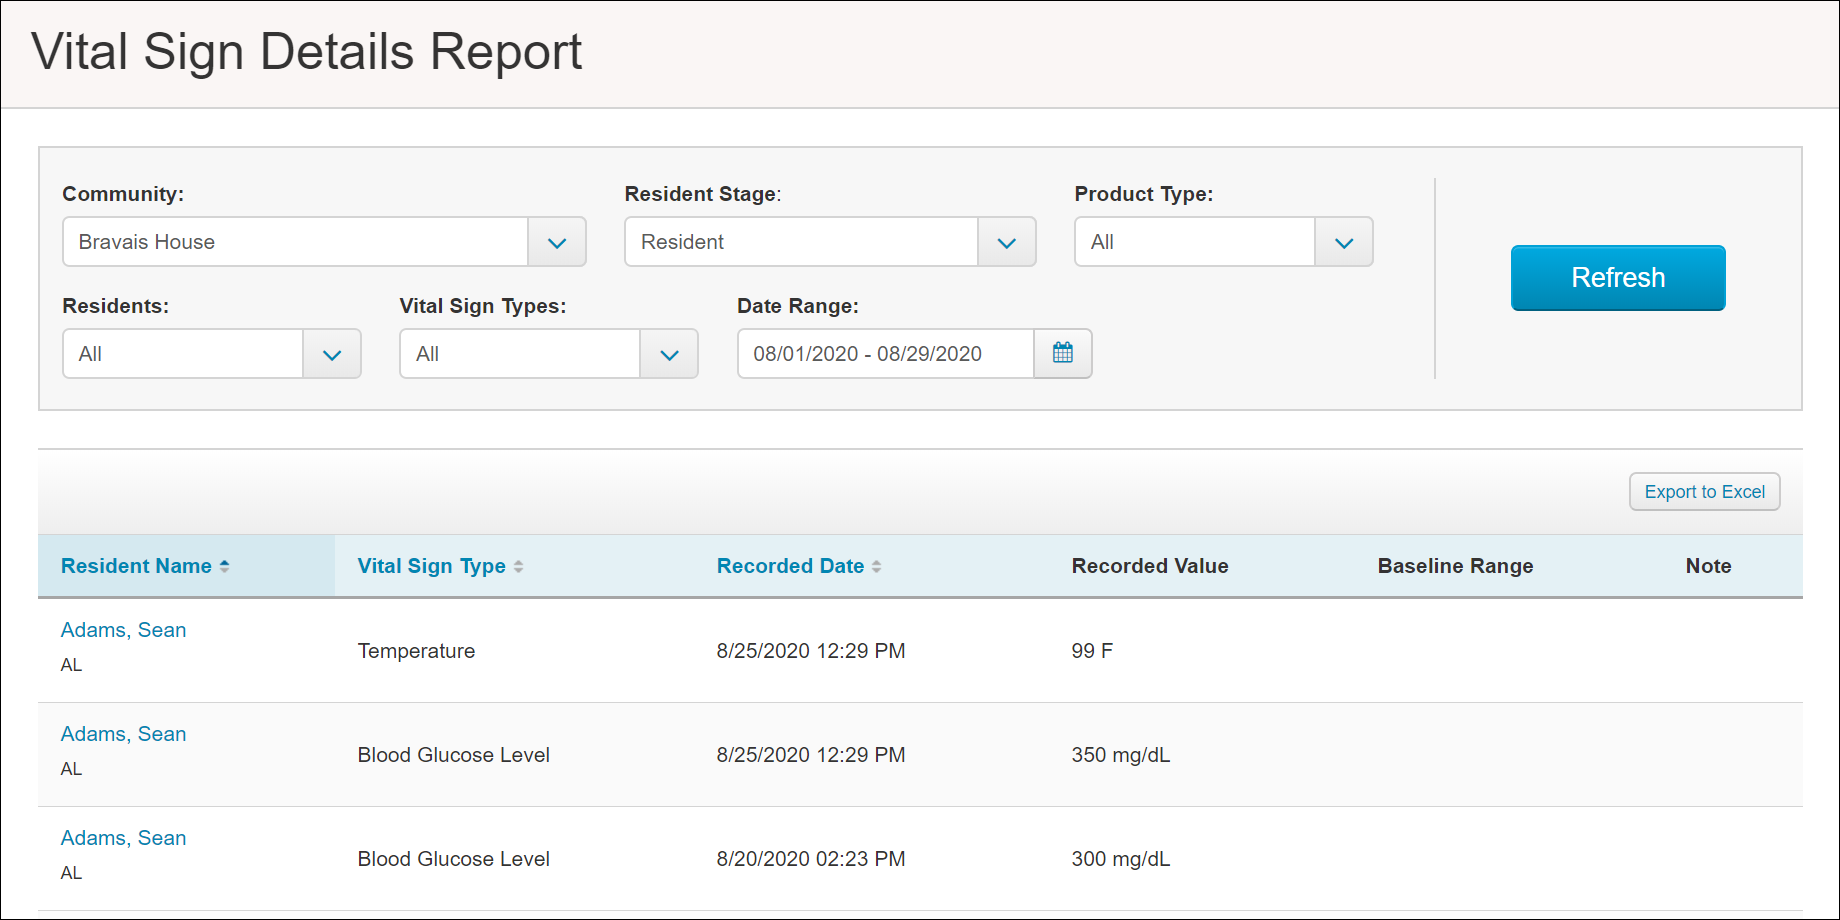
There are two reports we can use to print Vitals data. Most of the time, the Vital Sign Details report will show us everything we need.
- Go to Reports, find the Resident Reports section, and click Vital Sign Details.
- By default, this will show us the list of all vitals recorded for all residents this month to date. Use the filters to select specific residents, Vital Sign Types, and a Date Range. Click the Refresh button.
- Verify the vitals records you need are in the table below, and click Export to Excel to view these outside of ALIS.
Use the Vital Sign Summary Report to display a single vital type for one resident. This displays a line graph as well, and is printer friendly. 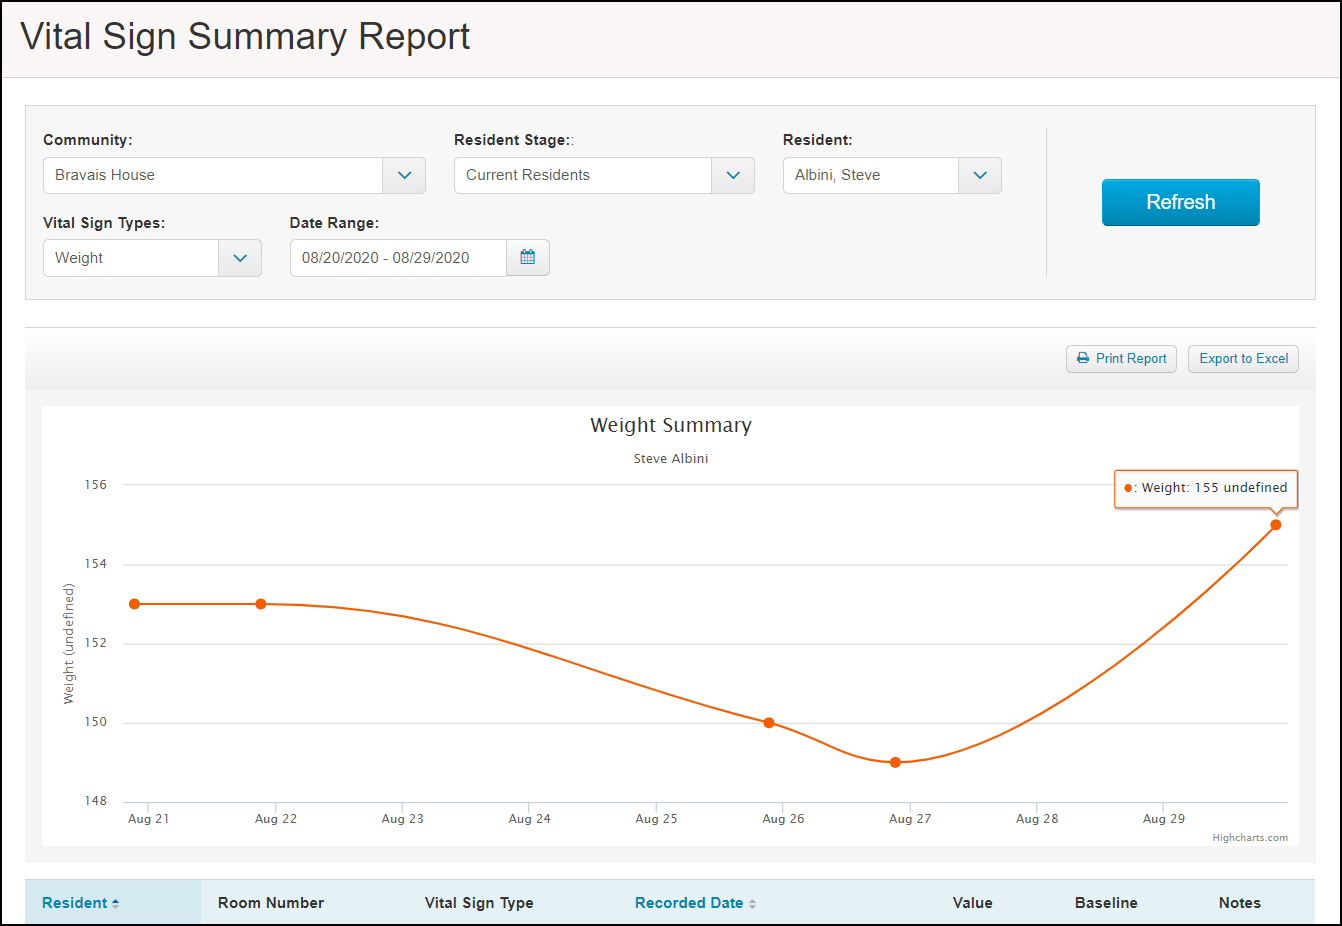
Print Service Plans
The easiest way to generate Service Plans is from the Print Center.
- Access the Print Center from the Care menu at the top of your page in ALIS.
- Click the Download button in the Service Plans sheets section.
- This will open a pane on the right with filters for Product Type and a list of residents you can multi-select.
- Once you click Download, a printable PDF document including all the Service Plans will generate.
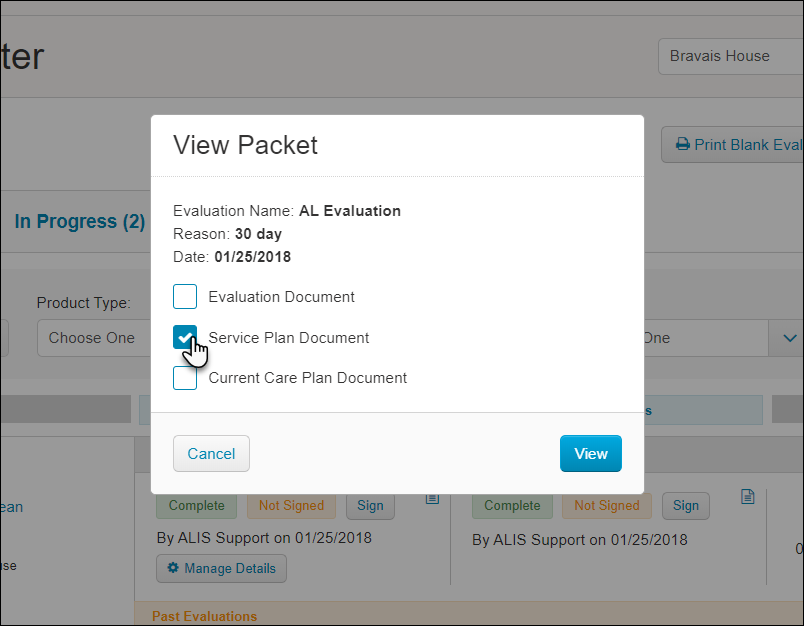
The Evaluation Center is another way to find the Service Plans documents. You can also do this in the Evaluations and Service Plans section of the Resident Profile.
- Go to the Evaluation Center and click the All Residents tab.
- Scroll to find your resident, or use the filter menus at the top to find the resident you are looking for.
- Click on either of the the small icons that look like a piece of paper. This will create a pop-up to ask which documents you want to view for the resident.
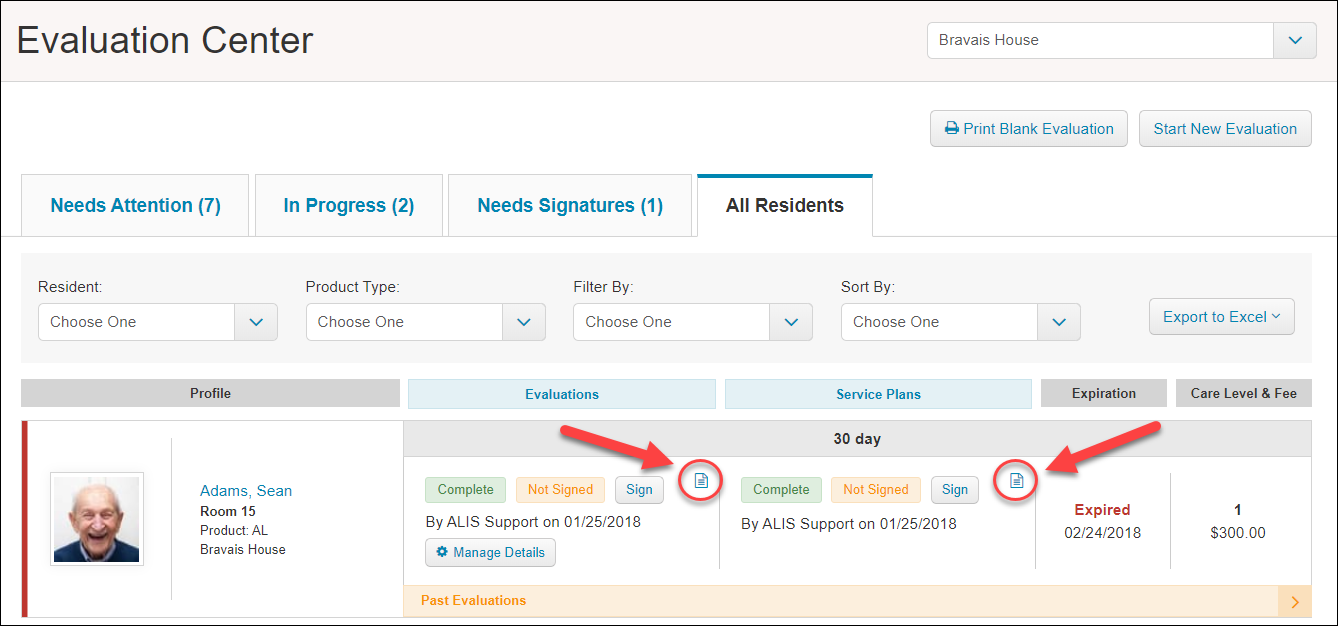
- Select the items you want to view. This will generate a PDF for viewing and printing.
Print Care Plans
The easiest way to generate Care Plans is from the Print Center.
- Access the Print Center from the Care menu at the top of your page in ALIS.
- Click the Download button in the Care Plans section.
- This will open a pane on the right with filters for Product Type, Care Program, and a list of residents you can multi-select.
- Once you click Download, a printable PDF document including all the Care Plans will generate.
You can also go to a Resident's Profile and open the Care Plan section about halfway down the page. Click the Download Care Plan button to open a PDF for viewing and printing. 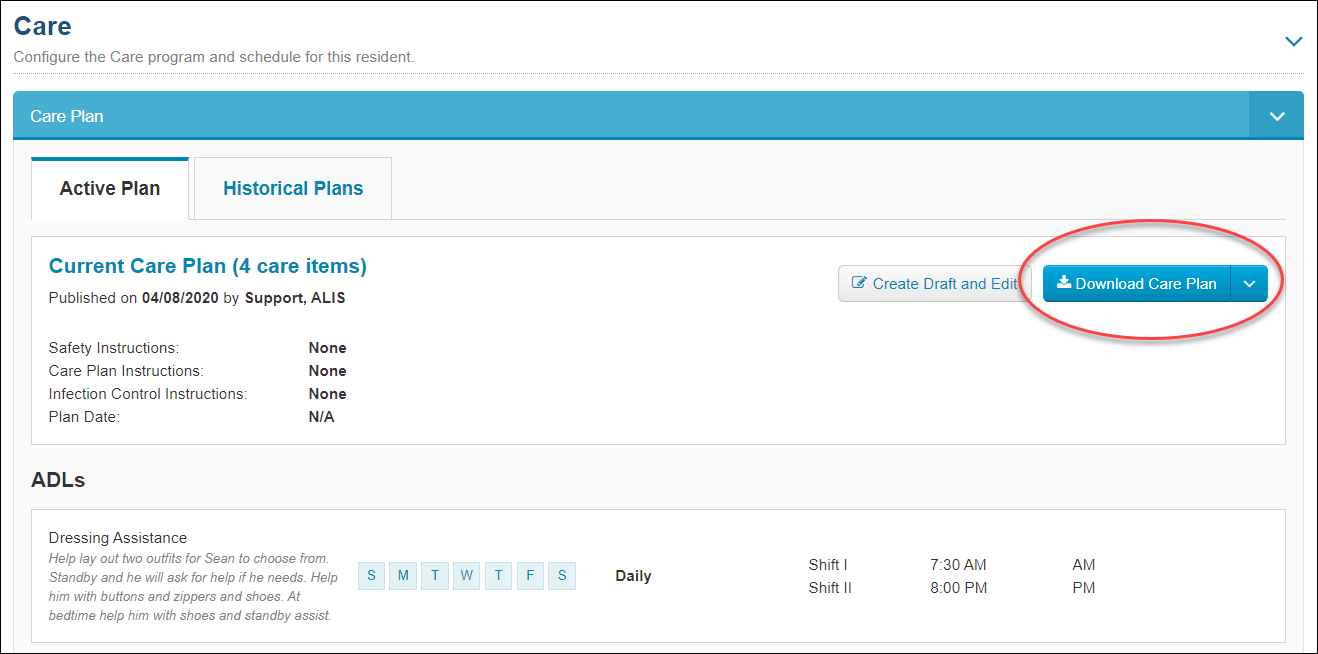
Comments
0 comments
Please sign in to leave a comment.