This guide outlines the steps required to complete the move-in process for resident billing. You can think of this as a checklist to ensure that the new resident will be billed accurately from the beginning.
We can take all steps in the Billing section of the resident profile toward the bottom of the page.
Step 1: Set a contact as a payer (Financially Responsible)
There is a chance that your clinical or administrative team has already added the resident's main contacts to ALIS, including someone who is financially responsible for the resident. This is even simpler if the resident is financially responsible.
This is most easily done in the Payers section.
Click the Payers blue bar to expand. The Default Payer will be the resident if no further setup has taken place.
- To add a Default Payer who is not the resident, click the +Add Payer button.
- In the pop-up, you can select one of the resident's existing contacts, or add a new contact.
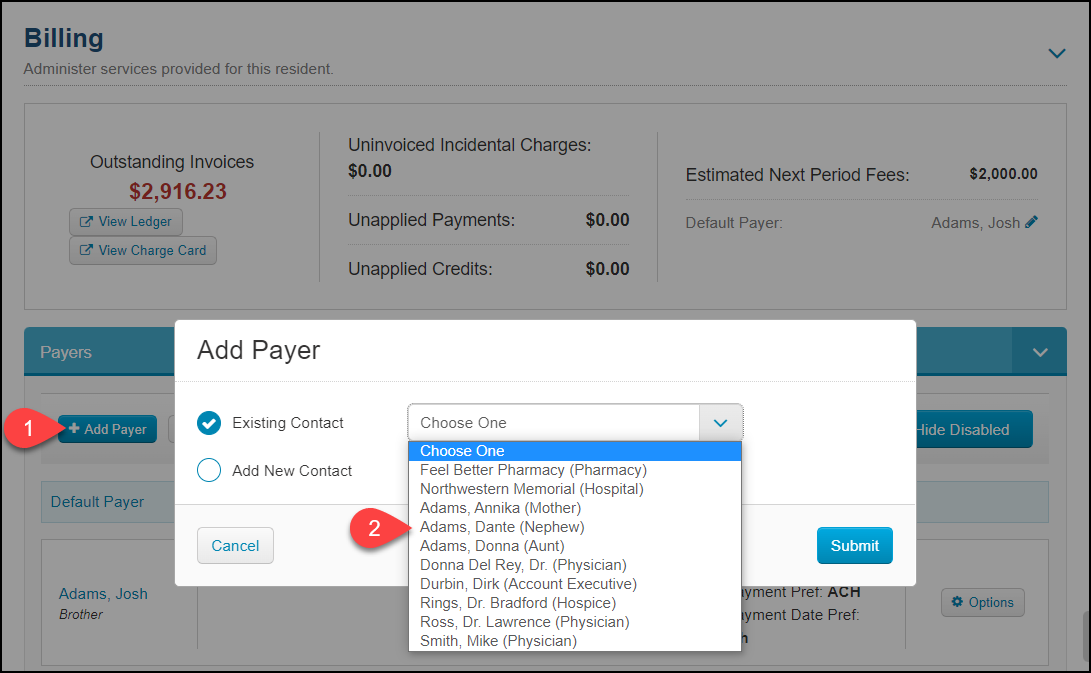
- For either option, you will be taken to the Add/Edit Personal Contact page. Here you must update the Payer Information section at the bottom:
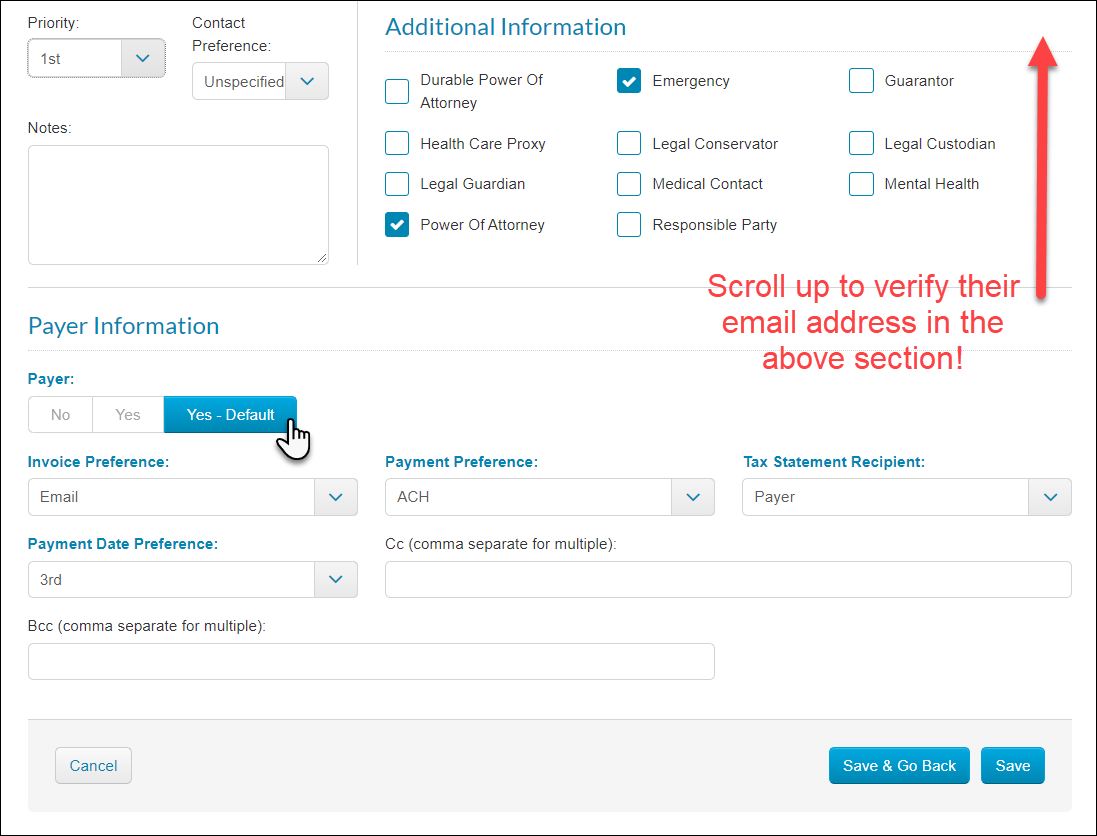
- Set the Payer option as either Yes or Yes - Default.
- If the person is added as a Payer who isn't default, they can be manually added to an Invoice later if needed.
- The Default Payer is most important to set.
- It is required that you set the Invoice Preference and the Payment Preference.
- This is also where you select whether the resident or this payer is the appropriate recipient of Tax Statements for the account.
- It is necessary to set the Payment Date Preference and enter the banking or credit card details if you will be processing recurring ACH or Credit Card charges.
- Scroll up and verify the email address in the Contact Information section if you have it! This will allow you to easily email bills, statements, and receipts to the payer later.
Step 2: Charges setup
The Recurring Charges are automatically billed each month, and make up the vast majority of revenue. These are added to the resident profile by selecting from a list of Billing Items that are configured in Billing Settings.
It is important to be familiar with the Billing Items available at your community, and to have a clear policy for which items are allocated to which residents. These are likely Rent and Care charges, or your organization might bill for these two services as one charge "all-inclusive".
- Scroll toward the bottom of the page to find the Recurring Charges section in the Billing area. Click the blue bar to expand the section and review the following details:
- This section displays a Current Care Level and Fee associated with their most recent Evaluation and Service Plan completed in ALIS. The Care Level may have no associated fees, or you might use this value to determine the resident's monthly care charge.
- Estimated Next Period Fees shows what you can expect to be billed in the next upcoming billing period based on the Active & Future charges below.
- If the Billing status shows "Active", you can expect an invoice to run on the Next Recurring Date. You can click the Pause button if you do not want the next invoice to generate, and you can edit the Next Recurring Date for this resident.
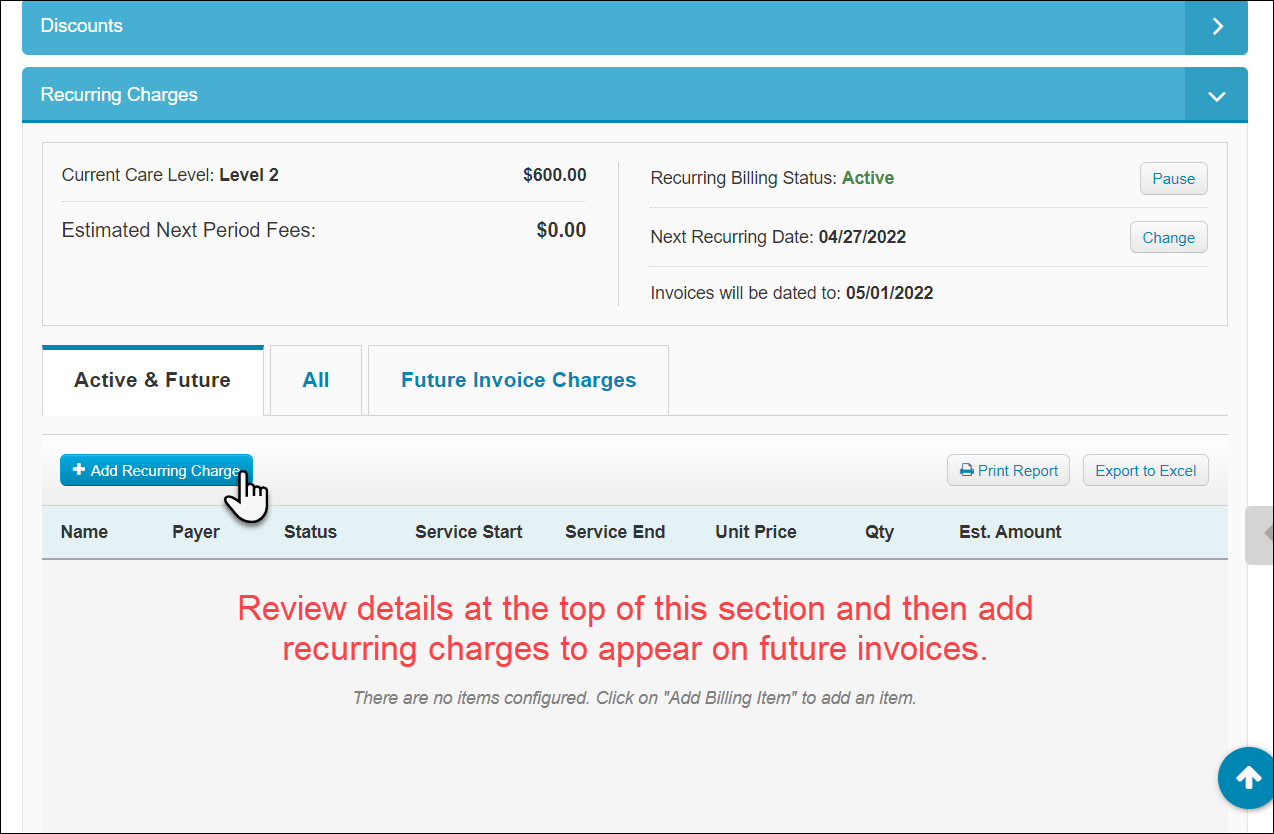
- In the Active & Future tab, start by clicking +Add Recurring Charge to add their monthly charges.
- This opens a pane on the right side of your screen where you can select the appropriate Payer Type, Payer (should most likely be the Default Payer), and Billing Item.
- Once you have selected the Billing Item, you can add a description to display on invoices, and update the Service Start date. The Price may be automatically filled in but it is editable if you need to change it. Click Submit to save.
- Next you might see an Impact Review pop-up requiring how you want to allocate the charges to invoices. Use this to create your Move-In Invoice! Set the "Action" column to Add Charge, and set the "To" column to Create New Invoice.
- For the other charges you add, set the "To" column to the invoice you initially created with the first charge.
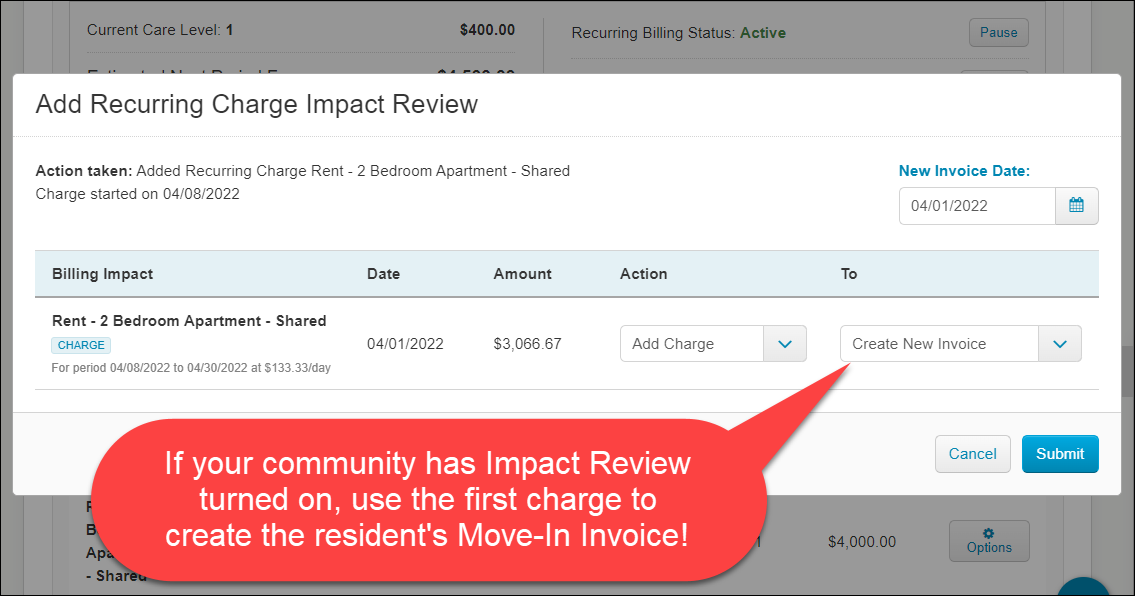 For more information about Impact Review settings, read this article: Impact Review.
- For the other charges you add, set the "To" column to the invoice you initially created with the first charge.
- If you have made a mistake on any of the items in Recurring Charges, you can edit or delete them from the Options button. Once invoices have been created, editing the charges will historically impact reports that detail recurring charges within the charge dates. Editing charges will not impact historically-generated invoices.
- If you are changing the rate on any of these items, use the option to Add Rate Change. Read this article for more information about Rate Changes: Rate Changes.
Step 3: Move-in invoice
Now that we have charges set up, we need to create our first invoice! Most likely this will contain prorated charges, so ALIS has a special Move-In Invoice that will help calculate everything. If you already created the invoice using the Impact Review modal in the previous step, there is no need to do this part!
- Open the Invoices section and click the Create Invoice button. Click the option Move In.
- In our Create Move In Invoice pop-up, we first need to update the Financial Move In Date and Physical Move In Date to be accurate for billing and occupancy purposes. Most likely the Financial Move In Date and the Service Start date of the rent charge should be the same.

- You can choose to create an invoice ("Bill For") This Month, Next Month, or This Month and Next Month. Since bills will run automatically for next month, you probably only need to do This Month.
- If you have a policy that the first bill also include the next month, use the third option.
- In the Active Charges area, you will see the recurring charges you set up in the previous step. You can edit Service Start dates if you made a mistake when they were originally added.
- Click Create Invoice.
- This puts us on the Edit Invoice page. The invoice has been created and you can send it to the payer! For more information about sending the invoices, read this article: How to send invoices and statements to payers.
- In our Create Move In Invoice pop-up, we first need to update the Financial Move In Date and Physical Move In Date to be accurate for billing and occupancy purposes. Most likely the Financial Move In Date and the Service Start date of the rent charge should be the same.
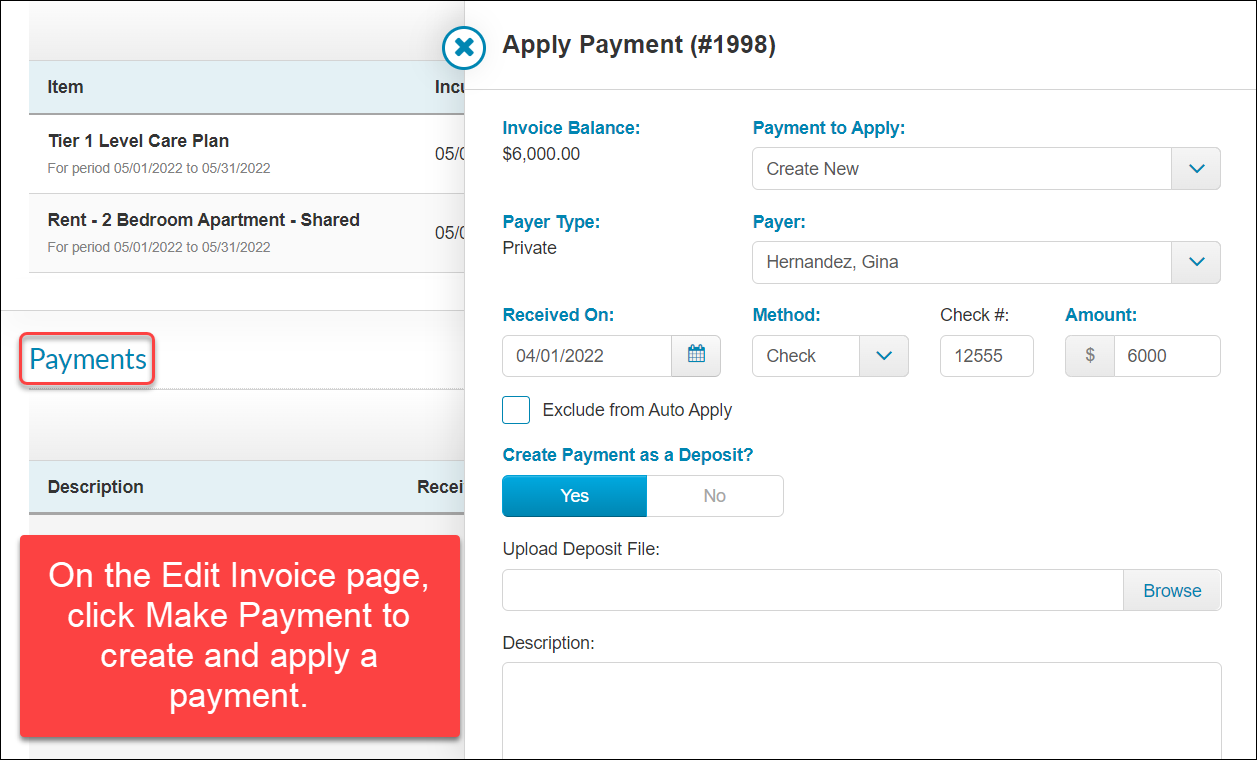
Step 4: Apply payments
You can apply payments from the Edit Invoice page or in the Payments section of the resident profile. You could also do this in the Payment Center if you are adding payments for other accounts as well. To learn more about the Payment Center, read this article: Payment Center Guide.
On the Edit Invoice page:
- Click the Make Payment button.
- The Payment to Apply menu will allow you to Create New, or select an unapplied payment that has already been added to the resident's account.
- Verify the Payer and Received On date.
- When adding a new payment, verify the method, Check # if applicable, and Amount. Click Yes to create the payment as a deposit if it has already been deposited.
- You can upload a deposit file for this individual payment.
- Add a description and internal note if necessary.
- Only select the "Opening" checkbox if your organization is new to ALIS Billing and you are creating a previous overpayment. Read this article for more information about Opening Balances: How to Set Opening Balances.
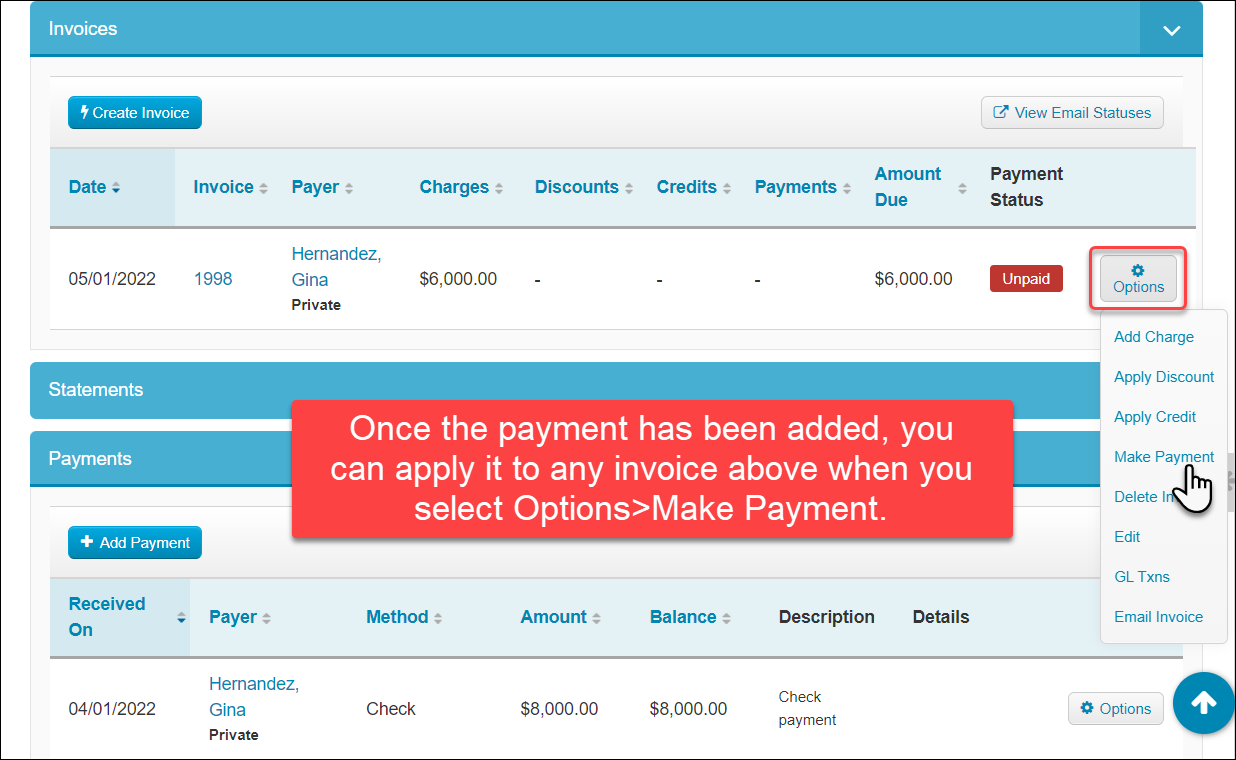
In the Payments section of the Resident Profile:
- Click the +Add Payment button. Follow the same steps as described above from the Edit Invoice page.
- The payment is now available to apply to any invoices, and is currently shown as an unapplied payment.
- To apply the payment, open the Invoices section of the resident profile, and click the Options button for your invoice. Click Make Payment.
- Verify the details of which payment you are applying, and click Save.
Step 5: Prepare for the next invoice
Once you have created the invoices, documented all payments, and sent payers the appropriate bills and receipts, this account is up-to-date for the current month.
ALIS will automatically run next month's bill based on your Recurring Charges settings, apply incidental charges added throughout the month, and can automatically apply overpayments.
Take the steps below to make sure the next month's invoice will be correct:
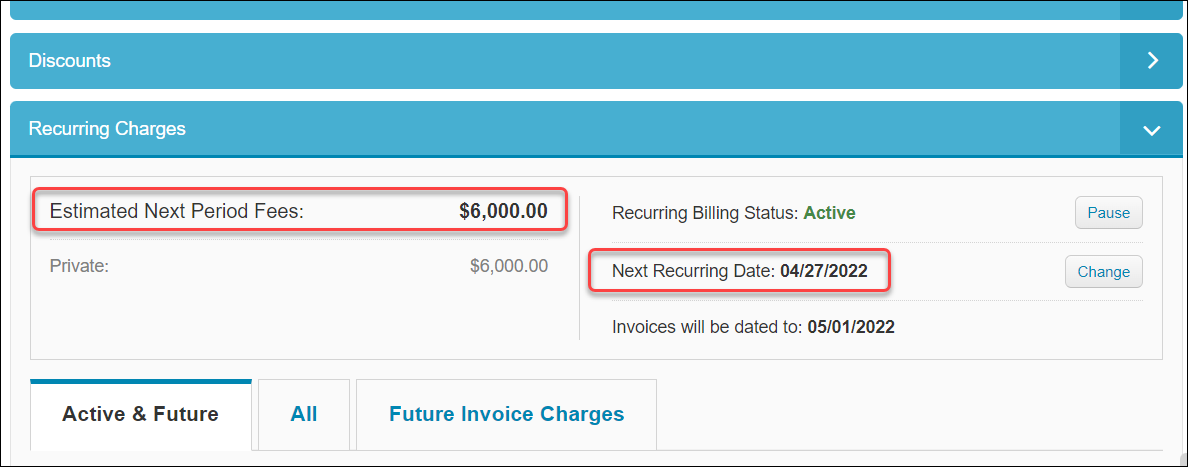
- Review the Recurring Charges section of the resident profile.
- Verify the Estimated Next Period Fees, and the Next Recurring Date.
- The Active & Future tab will show you all charges that are expected to bill and during which periods.
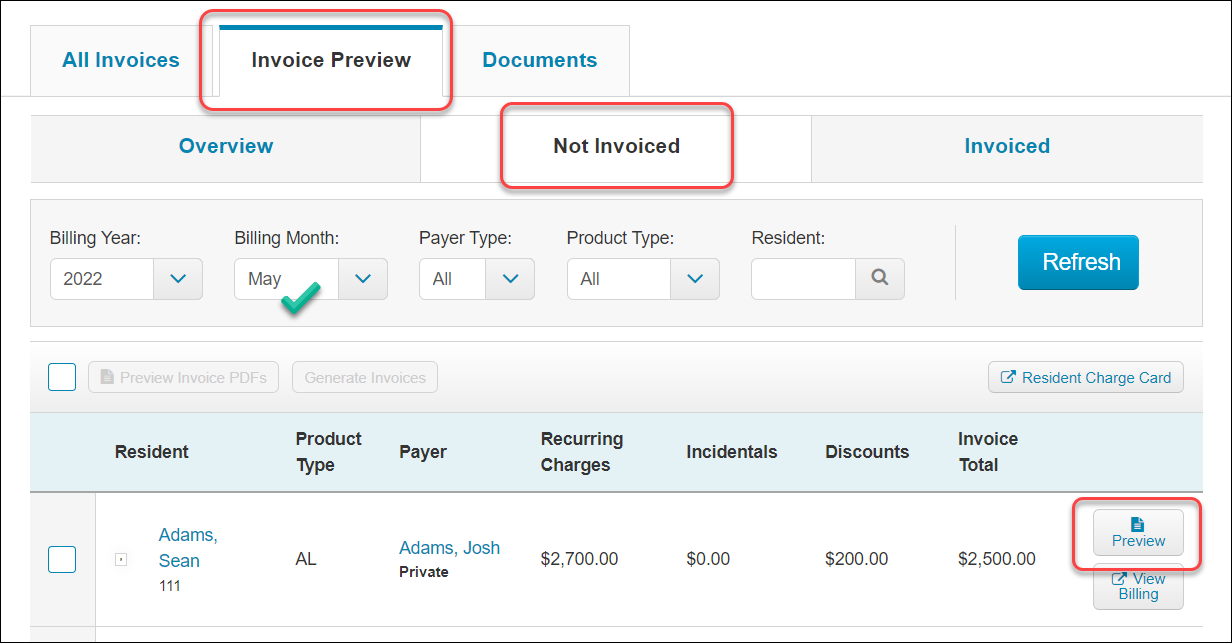
- Look at the Invoice Preview page.
- At the top of your page in ALIS, open the Billing menu and click Invoices.
- Open the Invoice Preview tab. This will show us what to expect during the next period.
- Most notably in the Overview tab, we can clearly see the residents who will not be billed for next period, likely due to details lacking in their set up.
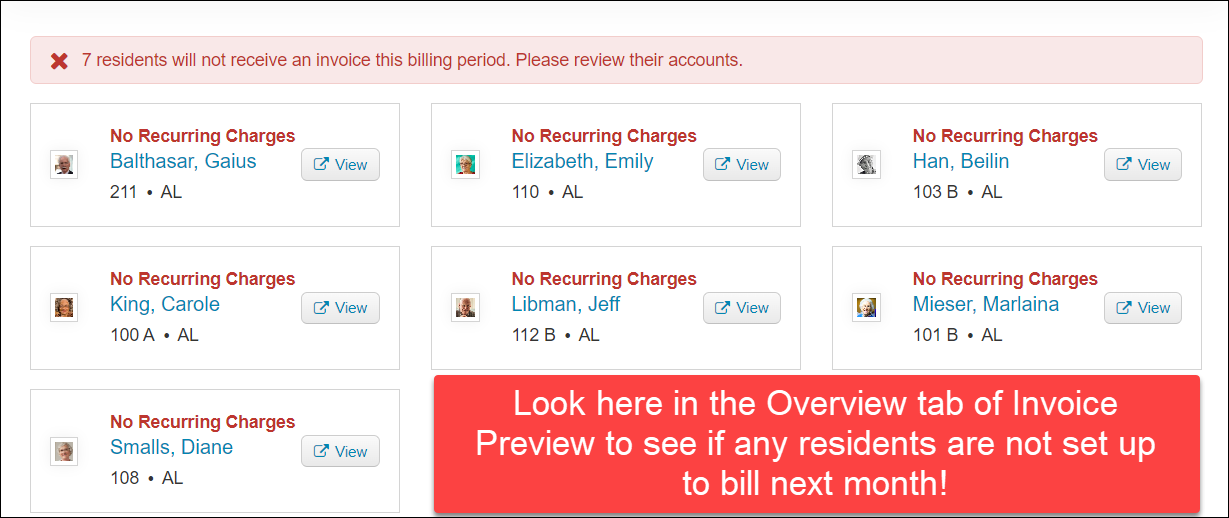
- Most notably in the Overview tab, we can clearly see the residents who will not be billed for next period, likely due to details lacking in their set up.
- Click Not Invoiced toward the top.
- Select the next month in the filters at the top and Refresh.
- For any resident for whom you want to preview invoices, click the Preview button on the left.
- This generates a Preview file you can use to verify details and decide if any changes should be made!
- Log incidental charges as needed throughout the month.
- Add charges to an individual resident's profile in the Incidentals section, or you can add them in bulk. Look to these articles for more information about adding incidentals:
- Most likely your ALIS Billing Settings are set to add incidental charges to future invoices automatically. If you need to update this setting, contact your administrator or ALIS Support!
Related articles:
Comments
0 comments
Please sign in to leave a comment.